
SmartCenter Server Agent
SmartCenter Server Agent
1) Almaden Server Agent (ASA) architecture
Almaden (Automatos) Server Agent (ASA) is the agent responsible for enabling the monitoring of your company’s servers. With this, it is possible to generate performance analysis reports, consolidation of server, among other services. Said services are deployed in an Internet-centric manner and in an automated manner, allowing them to be operated whenever and wherever you need.
1.1) Components
The Service uses three basic components in its operation:
I- Internet portals
II- The Collecting Agents
III- The intelligent analytical system.
I – Web pages
Secure Site – environment-v2.almaden.app and environment-smartcenter.almaden.app.
This page is the interface through which the user can use and customize Almaden’ services. The user mandatorily needs to create a personal account on this page before using any service. The personal account page is accessed through a secure connection (SSL), through the use of an identification (the user’s own email address) and a password defined by the user. It provides functions such as:
- Account management
Account creation and update, acquisition of new services, support request, etc.
- Download agents and documentation
Download agents to users’ equipment for testing or acquisition purposes. It is also possible to download documents such as readmes and manuals.
- Service operation
Trigger and customize each of the services for the enabled equipment, individually, for each equipment, or consolidated, for a set of equipment.
II – Collecting Agents
Said components monitor the equipment chosen by users, collecting data about its operation and configuration, encrypting it, compressing it and sending it to ALMADEN CLOUD via the Internet.
The ASA Agent, used for workstations, works based on the combination of two distinct modules, the Agent Module and the Relay Module:
- Agent Module
The Agent Module is installed on the equipment to be monitored. It collects, compresses and sends monitored data to the Relay Module. ASA can also optionally send samples directly to ALMADEN CLOUD if an http connection is available between them. The way in which information is acquired by the Agent Module is one of the differentials of Almaden’ services, since, in most cases, data is acquired directly from the operating system kernel, greatly reducing intrusion on them. Actually, agents are designed to collect data in the least intrusive way possible for each operating system platform.
- Relay Module
The Relay Module receives data coming from one or several Agent Modules, encrypts it and sends it to ALMADEN CLOUD. It takes place as follows: the Relay Module opens queues of concurrent connections with the ALMADEN CLOUD for sending data. Each machine will have its data package sent, one at a time, to the same queue, thus ensuring the order of the data.
The connection queues that the Relay Module opens with ALMADEN CLOUD are configurable through parameters. (See item 2.2, d.) It is possible to perform configurations such as: number of queues that can be opened with ALMADEN CLOUD, maximum and minimum number of packets in a queue, minimum percentage of queue size reduction, and time in seconds to scan queues.
The Relay Module can be installed on the same equipment as the Agent Module, providing the equipment with autonomy to communicate directly with the ALMADEN CLOUD. If there is a need to concentrate transmissions to the Internet at a single point, the Relay Module can be installed on a separate desktop, which we call Relay Server. A single Relay Server can concentrate and send data from several Agent Modules to ALMADEN CLOUD. It is also possible to configure an alternate Relay Server, which is automatically used in case of failure of the main Relay Server.
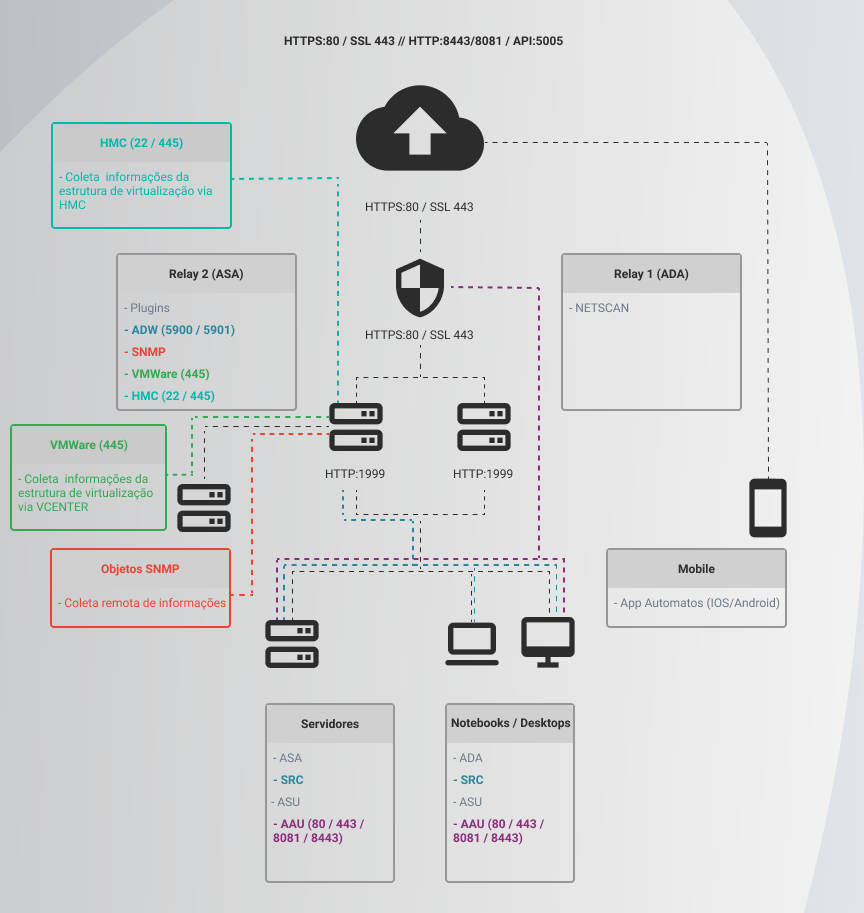
The architecture in separate modules was designed to provide great versatility in the installation of agents. The Relay Server acts as a sort of selective proxy for the Almaden service, which can be used to communicate isolated networks (for security reasons, for example) with the Internet, without violating current security policies. The figures below show the different ways to deploy agents:
Agent Plugins
Collecting agents have an open architecture that allows the installation of plug-ins capable of extending the functionality of an agent, enabling it to monitor other equipment performance parameters, such as collecting application performance measurements.
The following plug-ins for ASA are currently available:
- Almaden (Automatos) VMware Plugin;
- Almaden (Automatos) HMC Plugin;
- Almaden (Automatos) ADW;
- Almaden (Automatos) Thinclient Plugin;
- Almaden (Automatos) SNMP Plugin.
III – ALMADEN CLOUD
This is the component that hosts the IT intelligence included in Almaden’ services. In the first phase of the service operation cycle, ALMADEN CLOUD is responsible for receiving, decompressing, decrypting and storing the data sent by agents in a database. Once the storage is done, the user can activate the intelligence contained in ALMADEN CLOUD, through the services available on the portals environment-v2.almaden.app and environment-smartcenter.almaden.app, to analyze the collected data and produce conclusive and customized reports.
1.2) Supported Platforms
I- ASA – services for servers:
AIX
- 5.1 or higher (32-bit or 64-bit kernel)
Microsoft Windows
- Windows Server 2003 SP1 or higher
- Windows 7 SP 2 or higher
Linux
- Kernel 2.2, 2.4 and 2.6
- RedHat 6.2 or higher / derivatives (rpm)
- Debian 6 or higher or derivatives (dpkg)
Solaris
- 2.6 or higher for Sparc
HP-UX
- 11.0 or higher
Tru64
- 4.0F
- 4.0G
- 5.0
- 5.1
II- Almaden (Automatos) VMware Plugin:
Microsoft Windows
- Windows Server 2003 SP1 or higher
- Windows 7 SP 2 or higher
III- Almaden (Automatos) HMC Plugin:
Microsoft Windows
- Windows Server 2003 SP1 or higher
- Windows 7 SP 2 or higher
IV- Almaden (Automatos) ADW Plugin:
Microsoft Windows
- Windows Server 2003 SP1 or higher
- Windows 7 SP 2 or higher
V- Almaden (Automatos) SNMP Plugin:
Microsoft Windows
- Windows Server 2003 SP1 or higher
- Windows 7 SP 2 or higher
VI- Almaden (Automatos) Thinclient Plugin:
Microsoft Windows
- Windows Server 2003 SP1 or higher
- Windows 7 SP 2 or higher
1.3) Service operation
The installation of agents is a simple and fast task. Monitoring and analysis services come into operation automatically after installation. A summary of the installation and operation steps is presented below:
I – Installation
- The user creates his or her account on the environment-smartcenter.almaden.app page using an email address as a login identification, the CustomerID.
- The user downloads the agent installer specific to his or her platform.
- The user runs the installer on the equipment to be monitored by the Agent Modules and on the servers that will host the Relay Modules.
- In the sequence of installation screens that are displayed, the user informs his or her CustomerID and chooses the available installation options (sending collections over SSL or HTTP, etc.).
- The agent automatically enables the monitoring of machines via the Internet using the user’s account.
- The service starts working!!
II – Operation
- The Agent Module collects performance and configuration data from the server or workstation.
- The Agent Module sends the data, compressed and encrypted, to the ALMADEN CLOUD via the Relay Module and the Internet.
ALMADEN CLOUD receives the collected data and stores it in its databases. - The user activates one of the services available on environment-smartcenter.almaden.app.
- ALMADEN CLOUD receives the user’s request and generates the requested report in the available format (.pdf, HTML, etc.).
- Services that generate reports in .pdf format can be configured to automatically send them via email.
- For real-time updated services such as the RTM Wizard and the Consolidated RTM Wizard, ALMADEN CLOUD plots charts, updated every minute, on a Java console and also shows the processes running on the machine being monitored at that moment. Said services can also send notifications by several means such as email, short message, ICQ or SNMP trap, whenever it detects resource consumption overload or server unavailability.
2) Use of Almaden (Automatos) Server Agent (ASA)
2.1) Prerequisites for installing the agent
Before installing the ASA on the server you want to monitor, make sure you have some mandatory functionalities available in your connectivity features and your operating system.
I – Connectivity requirements
- You must install the Relay Module on a server with internet access (via Proxy/Firewall or NAT). The connection must support SSL or HTTP protocols and must be active during installation.
- The server hosting the Relay Module (Relay Server) must respond to “ping” commands during installation. A “ping” (ICMP Echo) will be issued by the Agent Module during installation, checking whether the Relay Server is working. If the Relay Server is on a different subnet, make sure you can “ping” the target server before installing the Agent Module.
II – Requirements for Windows family operating systems
- If you already have a previous version of ASA or any other Almaden (Automatos) agent installed on your server, you must uninstall it before installing the downloaded version of ASA. Uninstall Almaden (Automatos) agents via the Add or Remove Programs function in the Windows Control Panel.
- You need administrator privileges to install ASA.
III – Requirements for Unix family operating systems
- You need to have “root” privileges to install the ASA.
- If you have a previous version of ASA or any other Almaden (Automatos) agent installed on your server, you must uninstall it before installing the version of ASA you downloaded. The uninstall procedure is described in item “e) Uninstalling ASA” of this chapter.
2.2) Installing the ASA
a) Windows family platforms
ASA for Windows is distributed in the form of an executable file. Run it to start the installation process and follow the instructions in the windows that is displayed:
- In the License Agreement window, read the license terms carefully, select I agree if you accept it, and then click on Yes. If you do not accept it, click on No to exit the installation.
- Inform your CustomerID, the email you provided when creating your account on the environment-smartcenter.almaden.app website. If you have not created an account yet, please do it before proceeding with the installation.
- Enter the department to which your server belongs. This information helps to group servers while using the website services. This information is optional and can be changed later at environment-smartcenter.almaden.app. If you do not enter the department, the installed server will be included it in the “Default” department.
- Choose the directory in which you want the program’s binaries to be installed.
- Choose the type of installation you want:
a. “Express Setup”: installs both modules, both the Relay Module and the Agent Module.
b. “Custom Setup”: allows you to choose the module(s) to be installed.
- If you choose “Express Setup”:
a. You will be taken to another window. If you just click on Next, the ASA installer will try to connect with ALMADEN CLOUD automatically. It will try to connect via SSL or HTTP. Almaden encryption technology ensures that the same level of security is achieved using any protocol option. The ASA installer will test a protocol over time using the following sequence: first SLL, then HTTP. The test sequence ends when the Relay Module is able to successfully establish a connection with the ALMADEN CLOUD, through the protocol of the first successful connection. You will be able to change the default protocol later in the ASA Control Center. The ASA Control Center is the graphical user interface of the ASA. It will be available after you finish the installation process.
b. If the connection attempt with both platforms fails, you will be asked to choose a protocol and configure the connection manually. You can also force the installer to let you configure the installation manually by checking this option on the previous page, before clicking on Next. To configure the connection manually, proceed as follows:
I- Choose the connection protocol you want the Relay Module to use. Please note that the ASA installer will test the connection once it finishes configuring it, so it should be working by now. If not, you will not be able to continue the installation process.
If there is a firewall between your company’s network and the internet, choose the option “I have a firewall and will configure it later” to skip the connection test and configure the communication protocol and firewall later, through the ASA Control Center. Please remember that services are developed over the Internet. Thus, you will not receive them until internet access is available and the connection to the ALMADEN CLOUD is correctly configured.
II- Use the default server and port number (unless installing ASA with assistance from the Almaden support service).
- If you choose “Custom Setup”, you will be able to choose which modules you want to install:
a. If you only want to install the Agent Module, you must have the Relay Module running on another machine within your company’s network. In this case, provide the following information when requested:
I- The IP address of the server running the Relay Module. This server should respond to “ping” commands during installation.
II- The IP port number. The default value is 1999, but it can be changed in case of a conflict with the port. However, do not forget that this port has to be the same one used by the Relay Module; if not, there will be no connection established between the two modules.
b. If you decide to install only the Relay Module, the “host” server will only transmit sample data from other machines to the ALMADEN CLOUD. It will not be monitored by the ASA. In this case, you must follow the same steps described above for “Express Setup” (step 6).
c. If you select both modules you must follow the same steps defined for Express Setup.
- Choose the directory where you want the ASA Control Center shortcut to be placed.
- After successfully installing the agent, the machine will automatically be enrolled for service operation and monitoring activity will start automatically. We recommend that a few minutes after the end of the installation, you connect to your account on the site environment-smartcenter.almaden.app and verify whether the computer appears in the list of authorized machines in the reporting menu of any available service. Use a service that does not require a buildup of samples to work, such as the Asset Wizard or the RTM Wizard.
- In case of any other problem or question, please ask for additional support through the SUPPORT page, at support.almaden.ai.
b) Unix family platforms
The ASA for the several supported UNIX platforms (HP-UX, Solaris, AIX and Tru64) is distributed in an executable file. Go to the directory where you downloaded it and run it to start the installation process. Make sure the file has the proper running permissions.
- Read the License Agreement and accept it if you agree. If not, click on Enter to exit the installation.
- Inform your CustomerID, the email you provided when creating your account on the environment-smartcenter.almaden.app website. If you do not have an account yet, please request one before proceeding with the installation with your account manager.
- Choose the type of installation you want:
a. “Express Setup”: installs both modules, the Relay Module and the Agent Module.
b.“Custom Setup”: lets you choose which module(s) you want to install
- If you choose “Express Setup”, follow these steps:
a. Enter the speed of your network adapter (Linux only)
b. Choose the connection protocol to transmit data from the Relay Agent to ALMADEN CLOUD. Options are SSL or HTTP. Almaden’ encryption technology ensures that the same level of security is achieved using any protocol option.
c. Use the default server and port number (unless you are installing the ASA with assistance from the Almaden support team).
d. If automatic protocol detection fails, you will be asked if there is a firewall between your network and the Internet.
I. If you do not have a firewall, choose “No” and continue with the installation. If so, choose “Yes” and then choose one of the protocols supported by the ASA, as described below.
- If you choose a PROXY, SOCKS v4 or SOCKS v5 protocol, you will have to enter the name or IP address of the firewall and the port to connect to.
- If you choose authenticated PROXY or authenticated SOCKS v5, in addition to entering the firewall server name or IP address, you will also have to enter a username and password.
- If you choose transparent PROXY, you only have to enter a username and password.
After configuring the firewall connection, the ASA installer will test whether the firewall is responding to “ping” calls.
- If you choose “Custom Setup”, enter the modules to be installed:
a. Option 1 -> Only Agent Module
- Enter the IP address of the server on which the Relay Module is running. This server must be responding to “ping” commands for the installation process to continue.
- Enter the IP port number. The default value is 1999. You can change this number if you have port conflicts.
- Enter the operating speed of your network adapter (only for Linux installation) Option 2 -> Relay Module only
I. Follow the same instructions described above for “Express Setup” (step 4) Option 3 -> Both modules
I. Follow the same instructions described above for “Express Setup” (step 4)
- Decide whether the modules should start operating or not immediately after installation is complete.
- After successfully installing the agent, the machine will automatically be enrolled for system operation and monitoring activity will start automatically. It is recommended that a few minutes after the installation is finished, you log into your account at environment-smartcenter.almaden.app and check whether your server has been enabled in your account or not. You can do this by verifying that your computer appears in the list of enabled machines in the reporting menu of any available services. Use a service that does not require collection buidlup to work, such as the Asset Wizard or the RTM Wizard.
- If you have any other issues or questions, please ask for additional support via the SUPPORT page at support.almaden.ai.
c) Commands for silent installation
You can optionally install the ASA by entering the necessary parameters via a command line. This functionality is useful when performing a “silent install”, for example an installation procedure that does not display a window.
When performing a silent installation, the following command lines must be used before any others: “- – -“. A description of each available switch is provided below:
Switch: -iCUSTOMERID
Description: Specifies the Customer ID of the customer
Example: asa.XXXX.exe -s -a -s – iyour@customerid.com
Switch: -bDEPARTMENT
Description: Specifies the department to which the machine will be enrolled.
Example: asa.XXXX.exe -s -a -s -iyour@customerid.com -bAgents -cr -ca
Switch: -caHOST:PORT
Description: The Agent Module will install and send data packets to the HOST Server using the PORT. Example: asa.XXXX.exe -s -a -s -iyour@customerid.com -ca200.44.5.6:1999
Switch: -crPROTOCOL:HOST:PORT
Description: The Relay Module will install and transmit data using protocol (HTTP or SSL) to the HOST through the port.
Example: asa.XXXX.exe -s -a -s -plc:\ -iyour@customerid.com -crHTTP:environment-receiver.almaden.app:80
Switch: -credUSER:PASSWORD:DOMAIN
Description: Firewall/Proxy authentication information
Example: asa.XXXX.exe -s -a -s -creduserid:mypassword:mydomain
Switch: –
Description: Remove the agent
Example: adaXXXX.exe –s –a -s –erase
Switch: -niMAC_ADDR:SPEED
Description: Informs the speed of the network interface. It is only used on Linux platforms. Example: adaXXXX.exe –s -a –s -iyour@customerid.com -ni00-50-56-C0-00-08:100000
Switch: -nohname
Description: Prevents the hostname and IP address from being collected. Example: adaXXXX.exe –s -a –s -iyour@customerid.com -nohname
Switch: -nocheckproc
Description: Prevents the agent from trying to determine how many physical processors are installed on the computer.
Example: asa.XXXX.exe -s -a –s -iyour@customerid.com -nocheckproc
Switch: –
Description: No GUI will be installed. The agent will function as a background process. Example: asa.XXXX.exe -s -a -s -iyour@customerid.com –dAgents -cr -ca -noui
Switch: -oaarHOST:PORT
Description: Define an alternate HOST relay using the port
Example: asa.XXXX.exe -s -a -s -iyour@customerid.com -ooar200.44.5.6:8080
Switch: -orfpADDRESS:PORT
Description: Set firewall address and port
Example: asa.XXXX.exe -s -a -s -iyour@customerid.com -orfp200.44.5.6:15
Switch: -orlpPORT
Description: Defines the port used to receive collection from agents. This switch can only be used with the Relay module.
Example: asa.XXXX.exe -s -a -s -iyour@customerid.com -orlp80
Switch: -piPATH
Description: Specifies the path where the ASA will be installed
Example: ada.XXXX.exe -s -a -s -plc:\ -pi:c:\ada -iyour@customerid.com -ca
Switch: -plPATH
Description: Path where the configuration log file will be created
Example: asa.XXXX.exe -s -a -s -plc:\ -pi:c:\asa -iyour@customerid.com -ca
Switch: -relHOST:PORT
Description: Uses a relay for data transmission. This relay can be locally installed or not. Example: asa.XXXX.exe -s -a -s -iyour@customerid.com -dAgent -rel:192.168.1.48:1999
Switch: -skipPLUG_IN
Description: Disables an unwanted plugin.
Example: asa.XXXX.exe -s -a -s -iyour@customerid.com -skipiostat
Switch: -prtcond
Description: Enables sending the status of the printer(s)
Example: ada.XXXX.exe -s -a –s –prtcond -iyour@customerid.com
Switch: -prtstat
Description: Enables the sending of printer statistics.
Example: ada.XXXX.exe -s -a –s –prtstat -iyour@customerid.com
Switch: -noperfwizcheck
Description: It does not check whether the Almaden Perfwiz program is installed on the machine. Example: adaXXX.exe -s -a -s -iyour@customerid.com -noperfwizcheck
d) Parameters for the Relay Module
The parameters below can be used to control the connection queues that the Relay Module will open with ALMADEN CLOUD.
l – Windows family platforms
The values for each parameter must be edited in the Windows Registry Key through the following path:
HKEY_LOCAL_MACHINE\Software\Automatos\Asa\Relay\3.0 (illustrated in the figure below in blue). Then create a new DWORD value with the parameter name (shown in green) and enter the desired value (shown in red).
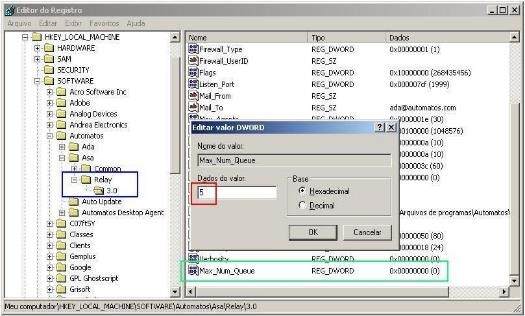
Parameter: Max_Num_Queue
Description: Defines the maximum number of queues that can be opened with ALMADEN CLOUD. The default is 10 rows.
Parameter: Max_Tus_Queue
Description: Defines the maximum number of packets in a queue, creating a new queue when this number is exceeded. The default is 1000 packages.
Parameter: Num_Tus_2_Check_Queue_Dec
Description: Defines the minimum number of packets in the queue to be able to use the distribution criterion. The default is 500 packages.
Parameter: Min_Perc_Queue_Dec
Description: Sets the minimum percentage of queue size reduction between checks. If the queue size decreases by less than this percentage, a new queue will be created. The standard is 5% of decrease.
Parameter: Queue_Check_Time
Description: Sets the time in seconds to check queues. Default is 300 seconds
II – Unix family platforms
The desired values for each parameter must be edited in the configuration file located at:
- AIX: /usr/lpp/automatos/asa/etc/arelay.cfg
- Tru64: /usr/opt/automatos/asa/etc/arelay.cfg
- Demais Unix: /opt/automatos/asa/etc/arelay.cfg
Parameter: $MAX_NUM_QUEUE = [number]
Description: Defines the maximum number of queues that can be opened with ALMADEN CLOUD. The default is 10 rows. Example: $MAX_NUM_QUEUE = 5
Parameter: $MAX_TUS_QUEUE = [number]
Description: Defines the maximum number of packets in a queue, creating a new queue when this number is exceeded. The default is 1000 packages.
Example: $MAX_TUS_QUEUE = 800
Parameter: $NUM_TUS_2_CHECK_QUEUE_DEC = [number]
Description: Defines the minimum number of packets in the queue to be able to use the distribution criterion. The default is 500 packages.
Example: $NUM_TUS_2_CHECK_QUEUE_DEC = 300
Parameter: $MIN_PERC_QUEUE_DEC = [number]
Description: Sets the minimum percentage of queue size reduction between checks. If the queue size decreases by less than this percentage, a new queue will be created. The standard is 5% of decrease. Example: $MIN_PERC_QUEUE_DEC = 15
Parameter: $QUEUE_CHECK_TIME = [number]
Description: Sets the time in seconds to check queues. Default is 300 seconds Example: $QUEUE_CHECK_TIME = 600
2.3) ASA Plugins
2.3.1 Almaden (Automatos) VMware Plugin:
VMware VMware plugin add remote virtualization framework information collector function to ASA, needs to be configured to connect to vcenter to collect this information with a user who has access to ASSET API.
2.3.1.1 VMware Plug-in Prerequisites
- ASA Agent Installation (up to three latest versions available).
- Vcenter username and password.
2.3.1.2 Installing the VMware Plug-in
The VMware Plugin is available for Windows platform and as it is a plug-in with the function of centralizing information from HostESX and VMs. It can be installed manually without an extensive procedure.
- After verifying the ASA installation and already with the VMware Plugin executable file in hand, run it as an administrator to start the installation and follow the instructions.
- Click on Next to proceed with the installation. Once that is done, the installation is complete. Just click on Finish.
.
2.3.1.3 Configuring the VMware Plug-in
As it is a Plugin, its configuration is made through ASA Control, the VMware Plugin is available for Windows platform and collects information from HostESX and VMs, and can be installed manually without an extensive procedure.
- Open ASA Control and go to the tab Configuration > Agent.
- In the Agent configuration, select the Plug-ins tab where the AVP should appear
- Double click on AVP and the screen for its configuration will be displayed:
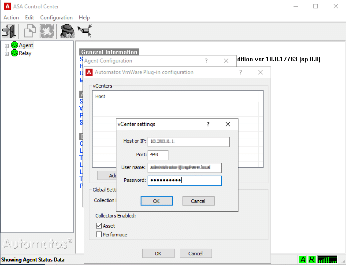
- Click on “Add”, and it will be possible to add the necessary settings according to the image.

- You can configure the frequency of collections, click on “OK”, then stop and start the Agent service again.
2.3.2 Almaden (Automatos) SNMP Plug-in:
Almaden (Automatos) SNMP Plug-in runs on the ASA Agent Module (agent for servers) and serves to enable monitoring services for devices with a standard SNMP agent installed. The machine on which the plug-in will be installed will function as a “monitoring center” that will remain in contact with the monitored devices on the network every minute.
The supported platforms are as follows:
Microsoft Windows
Intel platforms only
Windows NT 4 (Requirement: Service Pack 5)
Windows 2000
Windows XP Professional
Windows Server 2003
This plug-in can only be installed on Windows platforms, although it can enable monitoring of any device on the network, as long as it has an SNMP agent installed and properly configured. For example, it is possible to monitor servers or desktops of any platform, printers on the network, switches, routers, etc..
This machine, which will be responsible for monitoring the devices, must remain on continuously so that it can collect data throughout the day.
You can enter specific IP addresses to be monitored, or find out which IP addresses can be found by the plug-in on the network.
2.3.2.1 SNMP Plug-in Prerequisites
- ASA Agent Installation (up to three latest versions available)
2.3.2.2 Installing the SNMP Plug-in
The SNMP P lug-in can only be installed on Windows platforms, although it can enable monitoring of any device on the network as long as it has an SNMP agent installed and properly configured. It is possible to monitor, for example, servers or desktops of any platform, printers on the network, switches, routers, etc. .
This machine, which will be responsible for monitoring the devices, must remain on continuously so that it can collect data throughout the day.
You can enter specific IP addresses to be monitored, or find out which IP addresses can be found by the plug-in on the network.
- After verifying the ASA installation and already with the VMware Plugin executable file in hand, run it as an administrator to start the installation and follow the instructions.
- Click on Next to proceed with the installation. Once that is done, the installation is complete. Just click on Finish.
.
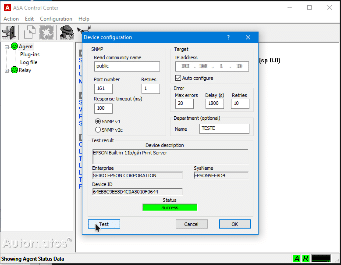
2.3.2.3 Configuring the SNMP Plug-in
As it is a Plugin, its configuration is through ASA Control. The SNMP Plug-in is available for Windows platform. It is possible to monitor, for example, servers or desktops of any platform, printers on the network, switches, routers, etc..
- Open ASA Control and go to the tab Configuration > Agent
- Double click on AVP and the screen for its configuration will be displayed:
- Click on “Add”, and it will be possible to add searches for devices.
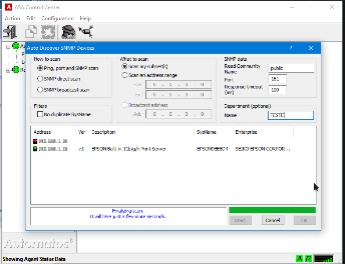
- Discovery of network devices is possible.
2.3.3 Almaden (Automatos) ADW:
Almaden (Automatos) Distribution Wizard (ADW Plug-in), is a plug-in for the ASA Agent Module used to enable the Almaden (Automatos) Distribution Wizard service. The ADW Plug-in controls the distribution, which can be unitary or massive, of software, file or command from servers known as “Radiator computers”.
Components for a Distribution with ADW:
- Target Machines
A Group with one or more machines where you want to install applications, run commands or copy files remotely.
- Repository and Radiator Machines
Machines that contain the remote files to be copied or run on the target machines and it is usually the same where it contains the ADW installed and configured, serving as the Radiator.
- Almaden Portal
Almaden site, where the user remotely controls the desired distribution, which can be of three types: Software, File or Command.
2.3.3.1 ADW Plug-in Prerequisites
• Target Machines
- LAN and SSL connection services installed (SRC Server prerequisite).
- ADA Agent Installation (up to three latest versions available).
- ASRC Server installation (up to three latest versions available).
• Repository and Radiator Machines
- LAN and SSL connection services installed (SRC Server prerequisite).
- They must contain the files to be distributed or installed on the target machines in the respective directories configured during the installation process.
- For complex installation software, such as Microsoft Office, installation packages must be created with the help of specific tools, such as WISE.
- ASA Agent Installation (up to three latest versions available).
- ADW plug-in installation (up to three latest versions available).
• Generic requirements
- Port 5900 must be kept open for SSL protocols.
- You need to create a user to access the ASRC Server. This user must belong to the Auto ADW SRC group that performs authentication through ASRC. If the machine belongs to a domain, this user must not be local. Access through ASRC Server will always be in intrusive mode.
2.3.3.2 Installing the ADW Plug-in
ADW is available for Windows platform and as it is a plug-in with the purpose of centralizing distributions, it can be installed manually without an extensive procedure.
- After verifying the ASA installation on the machine chosen for radiator and already with the ADW executable file in hand, run it as an administrator to start the installation and follow the instructions.
- Click on Next to proceed with the installation. At this point it will pause the ASA service, complete its installation and then starting the ASA service.
- Once that is done, the installation is complete. Just click on Finish.
2.3.3.3 Configuring the ADW Plug-in
As it is a Plugin, its configuration is through the ASA Control, but before starting it, it is necessary to provide the repository path with the files to be distributed.
- After creating a path on the repository machine and sharing that folder for reading, we can start configuring the ADW.
- Open ASA Control and go to the tab Configuration > Agent.
- In the Agent configuration, select the Plug-ins tab where the Distribution Wizard should appear:
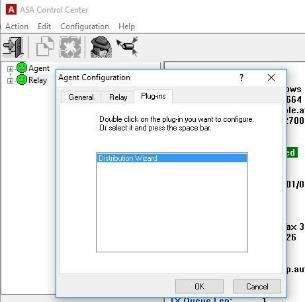
- Double-click on Distribution Wizard and the screen for its configuration to be displayed:
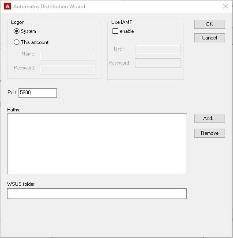
- On this screen, it will be possible to add the available distribution directory, for that purpose, click on “Add”.
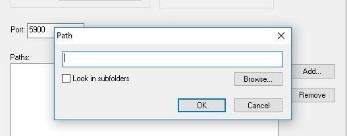
- Click on “Browse…” to select the repository path. Once this is done, there is still the option to click on “Look in Subfolders” if you want the subfolders of the chosen path to be listed in Almaden Portal.
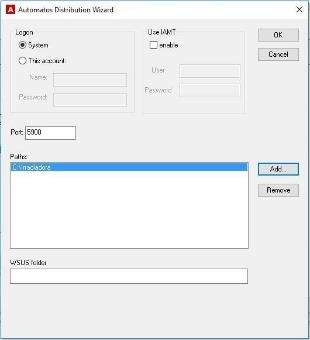
- After clicking on OK, you can configure new paths/directories. With all directories configured, click on OK on the setup screen to save and exit.
- After configuration, it is necessary to stop and start the Agent service.
- The configured information will appear in the Almaden portal as soon as the agent sends a new collection. For that purpose, we must follow the steps in “Managing a distribution in Almaden Portal”.
Observations:
- In Logon you can select between System, the installation pattern where the Agent will run the ADW in the Windows System layer without the need for a user, or select This Account, where you can specify a user to read the repositories selected.
- The field “Port.:” is 5900 by default, the same standard as ASRC, as it uses it to communicate with target machines. If the ASRC port has been modified in the environment, you should be careful to also change the port configured in the ADW to have connection compatibility.
2.4) Removing the ASA
Below is the procedure for uninstalling the ASA on each operating system platform.
I – Windows family platforms
Rerun the installation file you downloaded or use the “Add/Remove Programs” function from the Windows control panel. Follow the instructions on the screen.
II – Unix family platforms
Enter the commands described below according to your Unix platform. You need to have “root” privileges to do this.
- AIX: installp -u automatos.asa
- HP-UX: swremove ASA
- Solaris: pkgrm AUTMasa
- Linux: rpm -e asa
- Tru64
First stop both modules by running the following commands:
/usr/opt/automatos/asa/bin/aengine- stop
/usr/opt/automatos/asa/bin/arelay stop Then run the uninstall command:
setld -d ASACORE ASAPLGBASIC ASADOCS
3) ASA commands and functions
After installing the ASA, you can control, verify and customize the service through the GUI on Windows or bycommands on Unix platforms.
3.1) Commands for Windows family platforms
The ASA’s graphical user interface (GUI) is called the ASA Control Center. It is the main way to interact with the ASA in the Windows environment. You can launch it by clicking on the tomato icon on the taskbar or from the Automatos folder. The icon looks like this:

The ASA Control Center has two panels. The one on the left shows installed modules and their status. The one on the right shows the configuration. See the illustration below:

- Left Panel
This panel shows currently installed modules. The green “cheerful face” means the module is active. A
red “sad face” indicates that it is inactive. To enable/disable any module, right-click on the “smileys” or click on “Actions” on the upper command bar of the ASA Control Center.
- Right Panel
These fields only inform the settings. They cannot be edited. To view information for one of the modules, select it in the left pane.
I – Agent Module Status Information
General Information
Displays machine information: Operating system, Name, CustomerID and MachineID. The example above shows the WCAMPOS machine running Windows 2000 Professional with Service Pack 2. See the meaning of each exposed field:
- System: Description of Operating System’s model and version.
- Hostname: Hostname of the monitored system.
- CustomerID: It is the email you entered when creating your account. It identifies you in the environment-smartcenter.almaden.app
- MachineID: It is the number generated during the ASA installation that identifies the computer to ALMADEN CLOUD.
Machine ID (MID) information
The MID is made up of 12 bytes and is represented as a 24-character string. Each pair of characters represents a byte.
Example:

The MID is divided into four parts:
- The first MID has a size of 6 bytes.
- The second MID has a size of 4 bytes.
- The platform and OS identifier is 1 byte in size
- The checksum of the above items is 1 byte in size. In the example above:
- The first ID is: 00 10 AE 04 56 AA
- The second ID is: 00 34 AE 04
- The platform and OS identifier is: 15
- The checksum is: E4
The item 3 is comprised as follows: the first character is the OS, the second character is the platform.
Example:
If item 3 of the MID is 51 we will have: Linux + IntelX86
| Current OS character values: | ||
| SO | Amount | |
| WINNT | 1 | |
| WIN9X | 2 | |
| AIX | 3 | |
| SOLARIS | 4 | |
| LINUX | 5 | |
| HP | 6 | |
| TRU64 | 7 | |
| FREEBSD | 8 | |
| WINCE | 12 | |
| Current Platform character values: | |
| Platform | Amount |
| INTELX86 | 1 |
| INTELI64 | 2 |
| RISC | 3 |
| IBMS390 | 4 |
| ALPHA | 5 |
| NEW_INTELX86 | 5 |
| PWINCE | 14 |
Windows: The first ID is the MAC address of one of the network cards (it can be anyone), the second ID is the serial number of the volume where Windows is installed and the platform/OS identifier is 11.
Linux: The first ID is the MAC address of one of the NICs (it can be anyone), the second ID is the hostname of the machine in the form of a hash, and the platform/OS identifier is 51.
AIX: The first ID is the MAC address of one of the NICs (it can be anyone), the second ID is the AIX sysid and the platform/OS identifier is 33.
Solaris: The first ID is the MAC address of one of the NICs (it can be anyone), the second ID is the Solaris hostid, and the platform/OS identifier is 43.
HP: The first ID is the MAC address of one of the NICs (it can be anyone), the second ID is the HPUX hostid and the platform/OS identifier is 63.
Tru64: The first ID is the MAC address of one of the NICs (it can be anyone), the second ID is the machine’s serial number, and the platform/OS identifier is 75.
FreeBSD: The first ID is the MAC address of one of the NICs (it can be any), the second ID is the hostname of the machine in the form of a hash, and the platform/OS identifier is 81.
Agent Status
- Service Status: Indicates whether the Agent is active or not
- Version: Agent’s version
- PID: Agent’s identification number
- Started at: Date and time of the last activation
Data Transmission
- Connected to Relay: IP address of the machine hosting the Relay Module that receives the Agent Module data.
- LastTXBytes: Number of bytes sent to the Relay Module in the last collection.
- TotalTXBytes: Total bytes sent to the Relay Module from the last activation so far.
- Last sent: Date and time of the last collection sending.
- Last failure: Date and time of the last transmission failure. If there are no faults recorded, the message will be
“unknown”.
- TX packets: Total number of packages sent
- Package backlog: Total packets waiting to be transmitted
On the Left Panel, open the Agent Module directory. Under this directory there are the following status panels that can be displayed:
Plug-ins
- Shows installed collection modules and their status.
Log File
- Shows all events happened with the Agent.
II – Relay Module status information
The Relay Module panel is similar to the Agent Module:
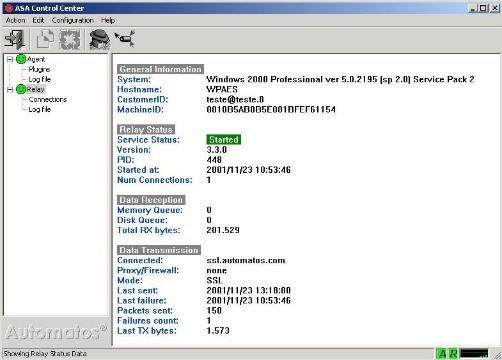
General Information
Displays machine information: Operating system, Name, CustomerID and MachineID. The example shows the WCAMPOS machine running Windows 2000 Professional with Service Pack 2.
- System: Description of Operating System’s model and version.
- Hostname: Hostname of the monitored system.
- CustomerID: it is the email you entered when creating the account. It identifies you at https://environment-smartcenter.almaden.app/
- MachineID: It is the number generated during the ASA installation that identifies the computer to ALMADEN CLOUD.
Relay Status
- Service Status: Indicates whether the Relay Module is active or not.
- Version: Version of Relay Module.
- PID: Relay Module identifier number.
- Started at: Date and time of the last activation.
- ASA Connections: Number of ASA agents sending data to this Relay Module.
- ADA Connections: Number of ADA agents sending data to this Relay Module.
Data Reception
- Memory Queue: Data packets in memory awaiting transmission to ALMADEN CLOUD.
- Disk Queue: Data packets on disk awaiting transmission to ALMADEN CLOUD.
- TotalRXBytes: Total bytes received by the Relay Module from the last activation so far.
Data Transmission
- Connected: If the transmission mode is SSL this field contains the IP address of ALMADEN CLOUD. If the transmission mode is HTTP, this field shows the time that the last connection with ALMADEN CLOUD lasted.
- Proxy/Firewall: Address of your proxy server or firewall, if any.
- Mode: protocol used in communication. It can be SSL or HTTP.
- Last Sent: Date and time the last collection was sent.
- Last failure: Date and time of the last transmission failure. If there are no faults recorded, the message will be
“unknown”.
- Packets sent: Number of collections sent.
- Failures count: Number of failed transmission attempts.
- LastTXbytes: Number of bytes sent by the Relay Module to the ALMADEN CLOUD in the last transmission.
On the Left Panel, open the Relay Module directory. Under this directory there are the following status panels that can be displayed:
Connections
- Shows a description of the monitored machines that are sending data to this Relay Module.
Log File
- Displays all events occurred with the Relay Module.
III – Top Bar Commands
Action
- Here you can start or stop modules. You can also reload plug-ins.
Edit
- Here you can copy the selected text to the Windows clipboard.
Configuration
Here you can change the configuration of installed modules.
ASA Control
The Asa Control Configuration dialog is shown when the ASA Control option is clicked on Configuration. In this dialog it is possible to change some ASA presentation parameters, such as color scheme, sounds, etc. Its fields are self-explanatory. Click on the Apply button to apply the changes.
Agent Module
Clicking on Agent will bring up the Agent Module configuration window. In this window you can change some of the Agent Module parameters. This window has three tabs as described below:
I – General tab
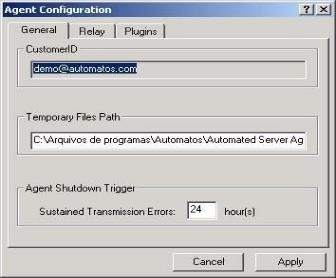
- CustomerID: it is the email informed when creating the account, which identifies it at https://environment-smartcenter.almaden.app/. This field is read-only.
- Temporary Files Path: Place where collections are stored until they are sent to the Relay Module.
- Sustained Transmission Errors: Time the agent remains active without being able to transmit collections. The Agent automatically stops when it is unable to transmit its collections for the period specified in this field.
II – Relay tab
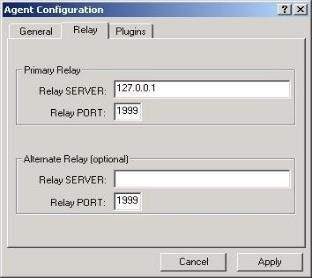
Primary Relay Panel
- Relay Server: Primary Relay Server IP
- Relay Port: Primary Relay Server port.
Alternate Relay Panel
- Relay Server: Alternate Relay Server IP. It is automatically used when Primary Relay is not available.
- Relay Port: Alternate Relay Server port.
III – Plug-ins tab
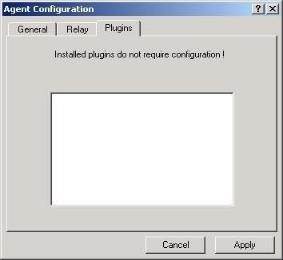
Shows the list of installed plugins.
Apply button
• Click on this button to carry out the changes made in the fields above. • There is no “undo” button. If you need to change the parameters back to their original values, you will have to change them individually and press Apply again!
Relay Module
Clicking on Relay will bring up the Relay Module configuration window. In this window you can change some of the Relay Module parameters. This window has 4 pages that can be accessed from the directory tree on its left panel, as described below.
General Settings page
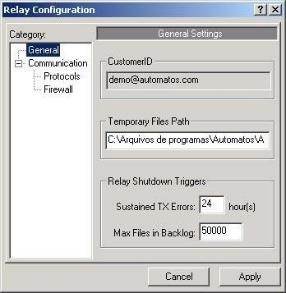
- CustomerID: Your email, provided when installing the agent. This email identifies you at https://environment-smartcenter.almaden.app/. Cannot be edited.
- Temporary Files Path: Place where collections are stored until sent to ALMADEN CLOUD.
- Relay Shutdown Triggers: These are the conditions that determine the automatic stop of the Relay Module. If the Relay Module is unable to transmit collections to ALMADEN CLOUD during the period specified in Sustained TX Errors or if the number of collections to transmit exceeds the number specified in Max Files in Backlog, the agent automatically stops.
Communications Port page
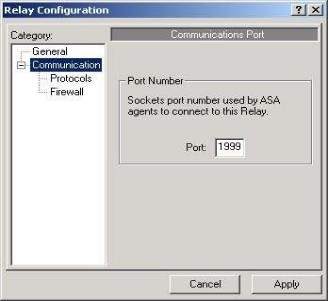
• Port: IP port used to transmit samples from the Agent to Relay. The default value is 1999, you can change it to avoid conflicts. If you change the port, don’t forget to change the agents too.
Protocol Selection Page
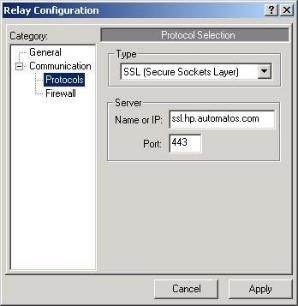
Type Panel
• SSL / HTTP: Allows you to choose the form of transmission of collections to ALMADEN CLOUD. Both protocols have the same level of security and use high quality encryption to transmit data.
Server panel
- Name or IP: Name or IP address of the server used for transmitting the collections.
- Port: Port used for transmission of collections. We suggest that you do not change these fields unless instructed by the Almaden support group.
Firewall Settings Page
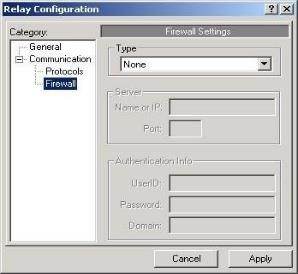
Enter this setting only if there is a firewall between your network and the Internet. Type Panel
• None / Proxy / Proxy Authenticated / etc.: Choose the type of firewall you use. If there is no firewall on your network, choose “None”.
Server panel
This panel is disabled if “Transparent Proxy” firewall is chosen.
- Name or IP: name or IP address of the firewall.
- Port: communication port with firewall.
Authentication Info panel
This panel is enabled when firewalls with authentication are selected.
- UserID: name of a user with firewall access.
- Password: user password.
- Domain: fill in the Windows NT domain when prompted.
Apply button
• Click on this button to carry out the changes made in the fields above. • There is no “undo” button. If you need to change the parameters back to their original value, you’ll have to change them individually and hit Apply again!
3.2) Commands for DOS
Although the ASA Control Center is the main interface on Windows platforms, some commands can be run through a DOS window.
The syntax for the Agent Module is always as follows:
aengine – <command name>
For the Relay Module, the sintax is as follows:
arelay – <command name>
To see the list of commands (help) on the DOS screen:
aengine – h
arelay – h
Description of commands for aengine and arelay:
- d Run the module and open a separate console for debugging.
- h Shows the list of commands
- i Install the module.
- k Stops the service and its processes “gently”. Precautions such as closing open files, etc. are taken. If it takes too long, try using the –K command.
- K Stops service instantly and abruptly.
- m Shows the MachineID of the computer. This is the number that identifies your machine to ALMADEN CLOUD.
- q Shows module status (active or inactive).
- r Create Windows registry keys for the Agent Module.
- s Start the service.
- v Shows the module version.
- u Uninstall the module.
3.3) Commands for UNIX family platforms
There are some commands that can be run on the ASA after installation.
The syntax for the Agent Module is always of the form:
aengine – <command name>
For the Relay Module, the sintax is as follows:
arelay – <command name>
Both commands must be run from the directory where they were installed. These are the directories for each of the UNIX platforms:
AIX: # /usr/lpp/automatos/asa/bin/
Tru64: # /usr/opt/automatos/asa/bin/
Other Unix: # /opt/automatos/asa/bin/
Description of Agent Module and Relay Module commands:
start
Makes the Agent Module start collecting and transmitting data to the Relay Module or the Relay Module starting transmitting data to the ALMADEN CLOUD.
machineid
Shows the MachineID of any server where the Agent Module or Relay Module is running.
stop
“Gently” stops the Agent or Relay Module and its processes. Precautions such as closing open files, etc. are taken. If it takes too long, try the following -kill command. kill
Stops the Agent/Relay Module instantly and abruptly.
status
Shows the status of the Agent or Relay Module in a list of parameters and variables.
restart
Makes the Agent/Relay Module re-read the configuration files, restarting the operation with new settings.
Example: to start the Agent Module type the following command according to the platform:
AIX: # /usr/lpp/automatos/asa/bin/aengine -start
Tru64: # /usr/opt/automatos/asa/bin/aengine –start
Other Unix: # /opt/automatos/asa/bin/aengine –start
Reconfiguring the ASA on UNIX platforms
To change any configuration parameters (email, Relay Module configuration, Agent Module configuration, etc.) after installation, run the asetup command as described below for your operating system:
AIX: # /usr/lpp/automatos/asa/bin/asetup
Tru64: # /usr/opt/automatos/asa/bin/asetup
Unix: # /opt/automatos/asa/bin/asetup
3.4) Recommendations, instructions and warnings
Instructions for Linux environment
- If a LAN network adapter is added or replaced in the server, run the utility
(/opt/automatos/asa/bin/asetup) to update the configuration file with the speed of your adapter.
- Due to a limitation of Linux kernel 2.2 only 4 disks can be monitored simultaneously on a Linux server.
- If using a custom version of Linux kernel 2.4, the ASA may not collect disk I/O information. This issue does not happen with official builds such as Red Hat 7.1 or higher.
- To use the ASA agent for Linux, you must have the “compat-libstdc++-<version>” package installed.
<version> may vary by distribution version.
General alerts and warnings
• If you change a machine’s network card or operating system, and the agent cannot find the machine’s serial number, ALMADEN CLOUD erroneously assumes it is a new enabled machine. If this happens, please contact the SUPPORT page at support.almaden.ai to resolve the issue.
3.5) Log files
Log files are created and updated by the agent at each occurrence of a significant event, such as the establishment of a connection with the Relay Module, the drop of this connection, running errors, etc. These files are essential for the Almaden support team to help the customer to debug the agent’s operational problems. These files are located in the following directories, depending on your operating system platform:
- Windows: \tmp subdirectory of the directory you specified during installation. The default path is C:\Arquivos de Programa\Automatos\Automatos Server Agent\tmp.
- AIX: /var/automatos/asa
- Other Unix: /var/opt/automatos/asa/
Send them to Almaden’ support team when requested.
