
Installation on Linux
Linux – Desktop Agent and Server Agent Installation
This document aims to show the installation procedure of Automatos Desktop / Server Agent for the Linux Operating System.
To start the installation, copy the binary to the /tmp directory of the machine that will be installed.
To do this, identify which Linux distribution is.
We currently have 2 types of “ADA” (Desktop Agent) and “ASA” (Server Agent) Agents:
- For Debian-based Distributions (dpkg / .deb). Debian, Ubuntu, etc;
- For Red Hat (RPM) based Distributions. Red Hat, Suse, Fedora, etc.
Agent Download
Access our SmartCenter portal with your credentials at:
Menu> Settings >Download
- Select the desired option: Desktop or Servers;
- Will you do Software Distribution? select the option:”NO” to display operating systems other than Windows;
- Choose the operating system which will perform the installation.
Note: You can only install and remove software through Smartcenter for Windows operating systems.

INSTALATION
DPKG x32 – Installation
Desktop Agent (ADA) and Server Agent (ASA) for common linux distributions: Debian, Ubuntu, Mint…
1 – Update Repository
apt update2 – Install library libc6 for x32
apt-get -y install libc63 – Elevate installation package permission (Check file name)
chmod 775 axa-##.##.##-en.i386.lin.deb4 – Install Desktop Agent or Server Agent (Check file name)
dpkg -i axa-x.x.x-en.i386.lin.debDPKG x32 – Data sending configuration
The data forwarding configuration can be done for SmartCenter Cloud or Central Relays
Execute only one of the following configuration commands, either SmartCenter Cloud or Central Relays.
NOTE: Replace the fields below with your environment.
<your@account.com>: The primary SmartCenter access account.
<Department>: The department to which the equipment should be organized in SmartCenter.
<ENV>: The database where the account is created in SmartCenter, which can be lad1 or lad2.
<RELAY1> and <RELAY2> : Replace the fields with the IP or Hostname of the Central Relays.
Data sending SmartCenter Cloud
SmartCenter Cloud – Desktop Agent (ADA)
/opt/automatos/ada/bin/asetup -s -a -s -i<your@account.com> -b<Department> -ca127.0.0.1:1999 -crssl:<ENV>-receiver.almaden.app:443SmartCenter Cloud – Server Agent (ASA):
/opt/automatos/asa/bin/asetup -s -a -s -i<your@account.com> -b<Department> -ca127.0.0.1:1999 -crssl:<ENV>-receiver.almaden.app:443EXAMPLE:![]()
NOTE: The expected outcome after executing the configuration SmartCenter Cloud command.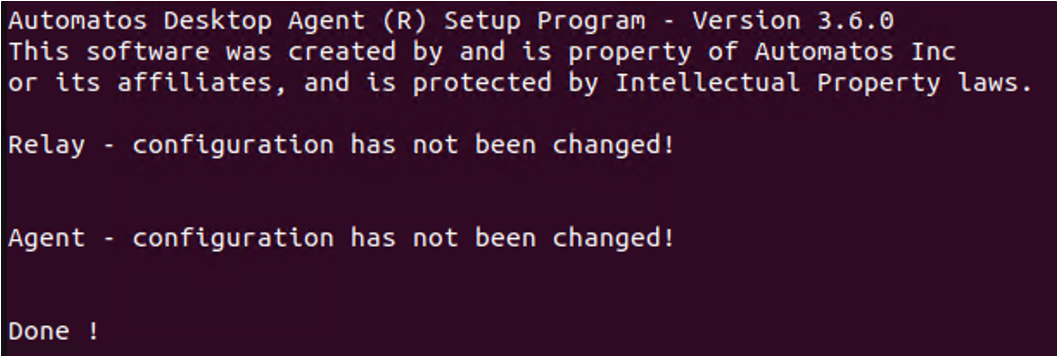
Data sending Central Relays
Central Relays – Desktop Agent (ADA)
/opt/automatos/ada/bin/asetup -s -a -s -i<your@account.com> -b<Department> -ca<RELAY1>:1999 -oaar<RELAY2>:1999Central Relays – Server Agent (ASA)
/opt/automatos/asa/bin/asetup -s -a -s -i<your@account.com> -b<Department> -ca<RELAY1>:1999 -oaar<RELAY2>:1999NOTE: The expected outcome after executing the configuration to Central Relays command.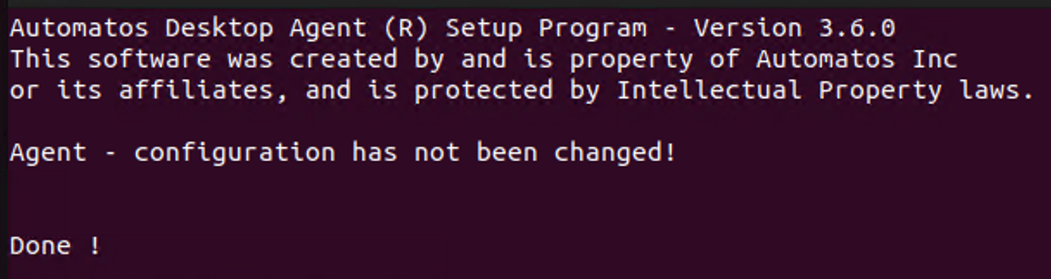
End of configuration DPKG x32
DPKG x64 – Installation
1 – Update Repository
apt update2 – Install library libc6 for x64
apt-get -y install libc6-i3863 – Elevate installation package permission (Check file name)
chmod 775 axa-##.##.##-en.i386.lin.deb4 – Install Desktop Agent or Server Agent (Check file name)
dpkg -i axa-x.x.x-en.i386.lin.debDPKG x64 – Data sending configuration
The data forwarding configuration can be done for SmartCenter Cloud or Central Relays
Execute only one of the following configuration commands, either SmartCenter Cloud or Central Relays.
NOTE: Replace the fields below with your environment.
<your@account.com>: The primary SmartCenter access account.
<Department>: The department to which the equipment should be organized in SmartCenter.
<ENV>: The database where the account is created in SmartCenter, which can be lad1 or lad2.
<RELAY1> and <RELAY2> : Replace the fields with the IP or Hostname of the Central Relays.
Data sending SmartCenter Cloud
SmartCenter Cloud – Desktop Agent (ADA)
/opt/automatos/ada/bin/asetup -s -a -s -i<your@account.com> -b<Department> -ca127.0.0.1:1999 -crssl:<ENV>-receiver.almaden.app:443SmartCenter Cloud – Server Agent (ASA):
/opt/automatos/asa/bin/asetup -s -a -s -i<your@account.com> -b<Department> -ca127.0.0.1:1999 -crssl:<ENV>-receiver.almaden.app:443EXAMPLE:![]()
NOTE: The expected outcome after executing the configuration SmartCenter Cloud command.
Data sending Central Relays
Central Relays – Desktop Agent (ADA)
/opt/automatos/ada/bin/asetup -s -a -s -i<your@account.com> -b<Department> -ca<RELAY1>:1999 -oaar<RELAY2>:1999Central Relays – Server Agent (ASA)
/opt/automatos/asa/bin/asetup -s -a -s -i<your@account.com> -b<Department> -ca<RELAY1>:1999 -oaar<RELAY2>:1999NOTE: The expected outcome after executing the configuration to Central Relays command.
End of configuration DPKG x64
RPM x32 – Installation
1 – Refresh Repository
zypper refresh2 – Install library glibc for x32
zypper install glibc -y3 – Elevate installation package permission (Check file name)
chmod 775 axa-x.x.x-en.i386.lin.rpm4 – Install Desktop Agent or Server Agent (Check file name)
rpm -Uhv axa-x.x.x-en.i386.lin.rpmRPM x32 – Data sending configuration
The data forwarding configuration can be done for SmartCenter Cloud or Central Relays
Execute only one of the following configuration commands, either SmartCenter Cloud or Central Relays.
NOTE: Replace the fields below with your environment.
<your@account.com>: The primary SmartCenter access account.
<Department>: The department to which the equipment should be organized in SmartCenter.
<ENV>: The database where the account is created in SmartCenter, which can be lad1 or lad2.
<RELAY1> and <RELAY2> : Replace the fields with the IP or Hostname of the Central Relays.
Data sending SmartCenter Cloud
SmartCenter Cloud – Desktop Agent (ADA)
/opt/automatos/ada/bin/asetup -s -a -s -i<your@account.com> -b<Department> -ca127.0.0.1:1999 -crssl:<ENV>-receiver.almaden.app:443SmartCenter Cloud – Server Agent (ASA):
/opt/automatos/asa/bin/asetup -s -a -s -i<your@account.com> -b<Department> -ca127.0.0.1:1999 -crssl:<ENV>-receiver.almaden.app:443EXAMPLE:![]()
NOTE: The expected outcome after executing the configuration SmartCenter Cloud command.
Data sending Central Relays
Central Relays – Desktop Agent (ADA)
/opt/automatos/ada/bin/asetup -s -a -s -i<your@account.com> -b<Department> -ca<RELAY1>:1999 -oaar<RELAY2>:1999Central Relays – Server Agent (ASA)
/opt/automatos/asa/bin/asetup -s -a -s -i<your@account.com> -b<Department> -ca<RELAY1>:1999 -oaar<RELAY2>:1999NOTE: The expected outcome after executing the configuration to Central Relays command.
End of configuration RPM x32
RPM x64 – Installation
1 – Refresh Repository
zypper refresh2 – Install library glibc x32
zypper install glibc-32bit -y3 – Elevate installation package permission (Check file name)
chmod 775 axa-x.x.x-en.i386.lin.rpm4 – Install Desktop Agent or Server Agent (Check file name)
rpm -Uhv axa-x.x.x-en.i386.lin.rpmRPM x64 – Data sending configuration
The data forwarding configuration can be done for SmartCenter Cloud or Central Relays
Execute only one of the following configuration commands, either SmartCenter Cloud or Central Relays.
NOTE: Replace the fields below with your environment.
<your@account.com>: The primary SmartCenter access account.
<Department>: The department to which the equipment should be organized in SmartCenter.
<ENV>: The database where the account is created in SmartCenter, which can be lad1 or lad2.
<RELAY1> and <RELAY2> : Replace the fields with the IP or Hostname of the Central Relays.
Data sending SmartCenter Cloud
SmartCenter Cloud – Desktop Agent (ADA)
/opt/automatos/ada/bin/asetup -s -a -s -i<your@account.com> -b<Department> -ca127.0.0.1:1999 -crssl:<ENV>-receiver.almaden.app:443SmartCenter Cloud – Server Agent (ASA):
/opt/automatos/asa/bin/asetup -s -a -s -i<your@account.com> -b<Department> -ca127.0.0.1:1999 -crssl:<ENV>-receiver.almaden.app:443EXAMPLE:![]()
NOTE: The expected outcome after executing the configuration SmartCenter Cloud command.
Data sending Central Relays
Central Relays – Desktop Agent (ADA)
/opt/automatos/ada/bin/asetup -s -a -s -i<your@account.com> -b<Department> -ca<RELAY1>:1999 -oaar<RELAY2>:1999Central Relays – Server Agent (ASA)
/opt/automatos/asa/bin/asetup -s -a -s -i<your@account.com> -b<Department> -ca<RELAY1>:1999 -oaar<RELAY2>:1999NOTE: The expected outcome after executing the configuration to Central Relays command.
End of configuration RPM x64
STATUS OF AGENTS
The following commands are used to check the configurations applied to the Desktop Agent and Server Agent.
Status – Desktop Agent
Desktop Agent “aengine” and “arelay” status
/opt/automatos/ada/bin/aengine -status
/opt/automatos/ada/bin/arelay -status
Status – Server Agent
Server Agent “aengine” and “arelay” status
/opt/automatos/asa/bin/aengine -status
/opt/automatos/asa/bin/relay -status
Check “aengine” and “arelay” status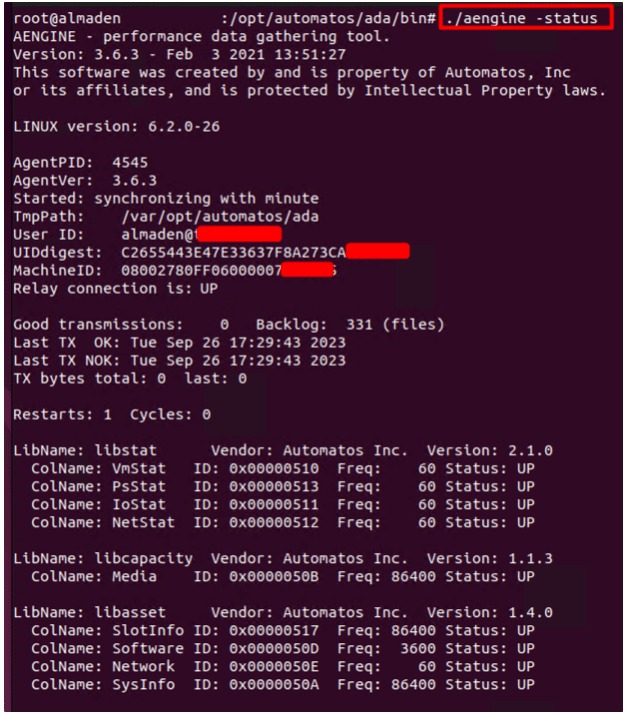

LOGS
Logs – File Path and extension
Paths and file log extensions.
Desktop Agent (ADA) Log files path
cd /var/opt/automatos/adaServer Agent (ASA) Log files path
cd /var/opt/automatos/asaLog file extensions “.elog” and “.rlog”
Logs – Detailed logs (Verbosity)
Enabling verbose logging causes the Desktop Agent and Server Agent to generate more detailed logs for us to analyze potential communication issues that may arise.
Stop the “aengine” and “arelay” services for Desktop Agent or Server Agent:
systemctl stop aengine

systemctl stop arelay
Open the configuration file “aengine.cfg”:
# For Desktop Agent
vim /opt/automatos/ada/etc/aengine.cfg

#For Server Agent
vim /opt/automatos/asa/etc/aengine.cfg
Edit the line and change the last digit to “7” “$VERBOSITY = 0x00000007” and save the file.”
Enable verbosity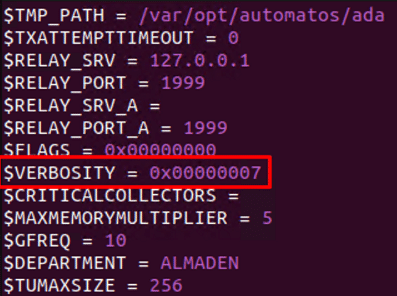
Start the ‘aengine’ and ‘arelay’ services for Desktop Agent or Server Agent:
systemctl start aengine

systemctl start arelay
Note: Please wait for approximately 5 minutes and collect the log files from the ‘Logs – File Path and extension’ section.
After collecting the log files, revert the configuration file to $VERBOSITY = 0x00000000, to prevent unnecessary extensive logs from being generated.”
UNINSTALL
Commands used for uninstalling the agents.
Uninstall DPKG
# Desktop Agent
dpkg -r ada

# Server Agent
dpkg -r asa
Uninstall RPM
# Desktop Agent
rpm -e ada

# Server Agent
rpm -e asa
SERVICES
Services
Interacting with the Desktop Agent and Server Agent services.
# Start Services
systemctl start aengine
systemctl start arelay

# Stop Services
systemctl stop aengine
systemctl stop arelay

# Restart Services
systemctl restart aengine
systemctl restart arelay

# Status Services
systemctl status aengine
systemctl status arelay