
Install Netscan
🔍 Netscan
Network Scan for Devices without Agent
The Netscan feature allows for a complete scan of the local network to identify devices that do not yet have the agent installed. This functionality is essential to ensure full visibility of the IT environment, including “invisible” assets that are not yet under management.
Through network discovery techniques (ping and SNMP), Netscan detects computers, printers, switches, routers, and other connected devices. Basic information — such as machine name, IP address, manufacturer, and identified operating system — is collected and displayed in an easy-to-analyze interface.
With this data in hand, you can:
- Plan the mass deployment of the CIQ ITAM agent on the discovered devices
- Audit your network for unauthorized equipment
- Identify risk points and expand solution coverage
Netscan is a key tool for expanding asset management without relying solely on pre-installed agents, helping your organization achieve full control over the IT infrastructure.
Prerequisites
Before installing NetScan:
- Compatible only with Microsoft Windows 10 or higher.
- ADA (Desktop Agent) must be installed
- The device must be powered on and connected to the network during scan periods
Protocol and Port
- ICMP
- 137/138/139 – TCP and UDP
- 161 (SNMP) – TCP and UDP
- 445 TCP and UDP
NetScan Installation
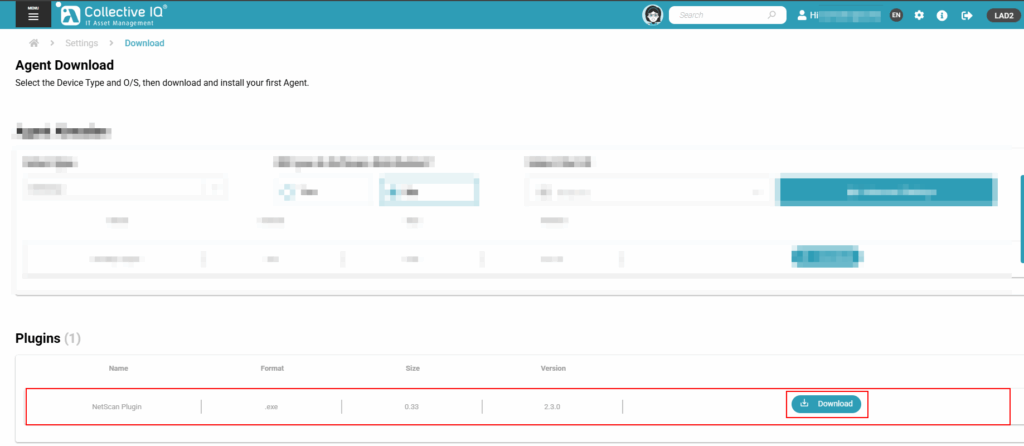
Download Plugin Netscan
Menu> Settings> Agent Download

Install Netscan

- Click “
Next“; - Accept the terms on the “License Agreement” screen and click “
Yes“ - Click “
Install“ to begin. - After installation, click “
Finish“- ⚠️ Note: If an error occurs, make sure the
Desktop Agentis installed
- ⚠️ Note: If an error occurs, make sure the
NetScan Configuration
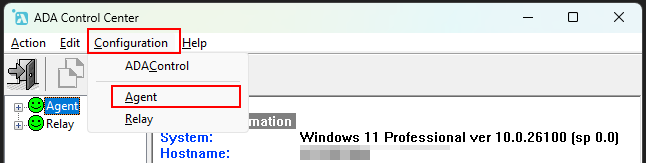
- Open the ADA Control Center:
- Access it from the folder:
C:\Program Files (x86)\Automatos\Desktop Agent\adacontrol.exe
- Access it from the folder:
- Go to
Configuration > Agent
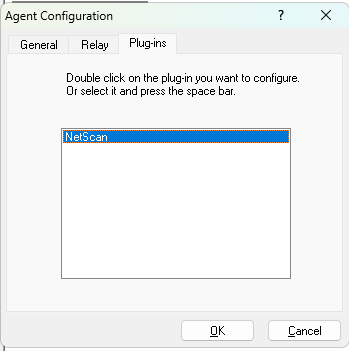
- In the
Plug-instab, double-click “NetScan“
IP Ranges settings:
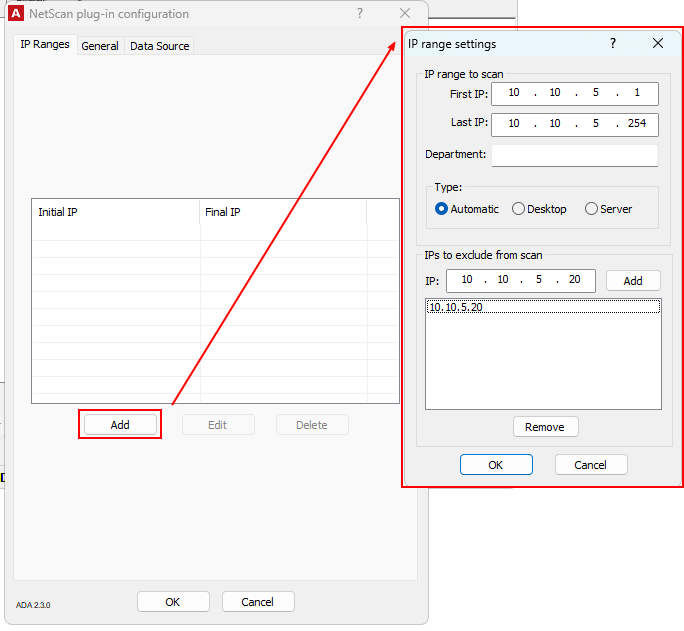
- Click
Addto include IP ranges - Fill in the fields:
First IP:Starting IP for the scan.Last IP:Ending IP.Department Name (optional):name of the department for those IPs.Type:leave as “Automatic” (Auto detect).IPs to exclude:IPs to ignore during the scan.
- Click “OK” when finished.
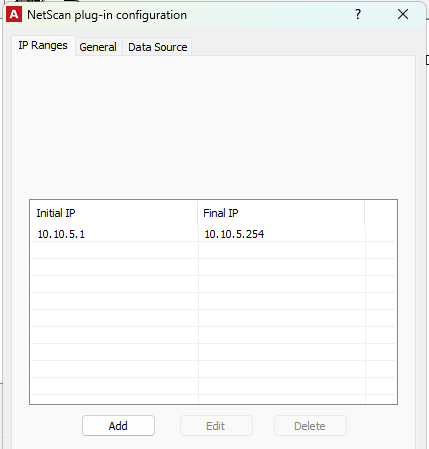
- Click “OK” to save.
General tab:
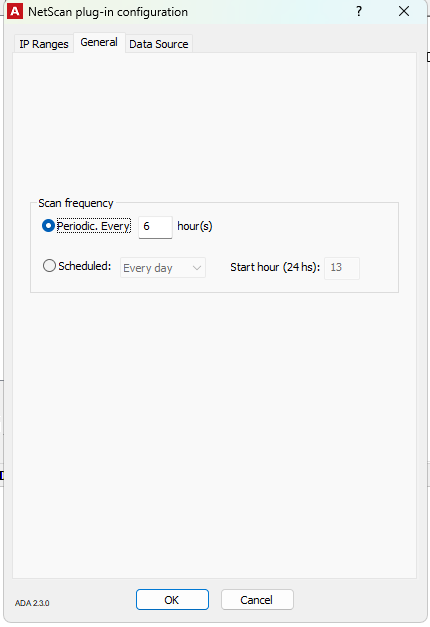
- Set scan frequency:
Scan Frequency:The execution will be performed every “X” hours.Scheduled: Set the execution to run daily or weekly, starting at a specific time.
Data Source tab
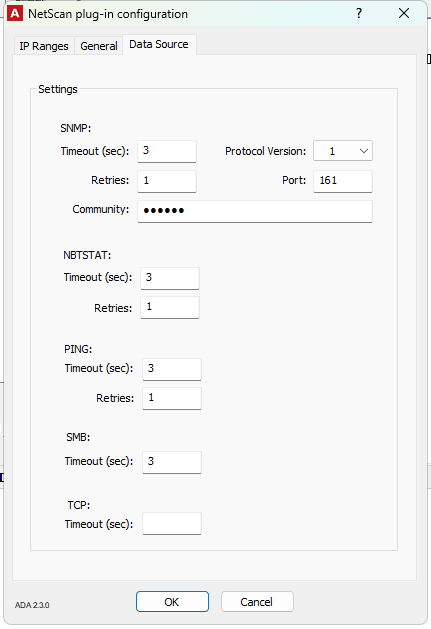
- In the
Data Sourcetab (optional, change only if needed):SNMP: Enables SNMP if NetBIOS failsTimeout (sec): Timeout for protocol responseRetries: Number of attempts
- Restart the ADA (Desktop Agent) after saving your settings
- Prompt Command:
sc stop "AutomatosDesktopAgent"
sc start "AutomatosDesktopAgent"
- Prompt Command:
The configuration is complete. Please wait at least 6 hours before retrieving the information collected by Netscan on the CIQ ITAM portal:
Menu> Inventory> Reports> Device without Agent
How NetScan Collects Data
The data collection process works as follows:
- Sends ICMP (ping) to IPs
- If it fails, it tries NetBIOS
- If NetBIOS fails and SNMP is enabled, it tries SNMP
- Lastly, if all else fails, it attempts to retrieve data via reverse DNS
Configuration Backup
If you need to change the device that will support the Netscan plugin, the configuration with IP ranges and exceptions can be backed up so you don’t have to redo all the work.
- Make a backup of the file ” netscancfg.xml” located in the directory:
C:\Program Files (x86)\Automatos\Desktop Agent\netscancfg.xml

- Paste the file into the same directory of the device you are migrating.
- Restart the Desktop Agent services.
Prompt Command:sc stop "AutomatosDesktopAgent"
sc start "AutomatosDesktopAgent" - The backup and migration were completed successfully.
Step-by-step to Diagnose an Undetected Machine using Netscan
1. Check if the machine responds to PING
On the server where Nestcan is installed:
Open Command Prompt and type:
ping [IP_of_the_machine]If the ping fails, this already prevents the first step. Check:
- Is the machine turned on?
- Is it connected to the correct network?
- Is there a firewall blocking ICMP (ping protocol)?
2. Test NetBIOS access (ports 139 or 445)
Make sure the File Sharing Service is enabled on the machine.
In Command Prompt, type:
nbtstat -A [IP_of_the_machine]Result analysis:
- If NetBIOS information is returned, this layer is functional.
- If it fails, NetBIOS may be disabled or blocked by a firewall.
3. Check if SNMP is enabled (if used by Nestcan)
Try an SNMP query:
snmpwalk -v2c -c public [IP_of_the_machine]Result analysis:
- If information is returned, SNMP is active and working.
- If it fails, SNMP may be disabled or blocked by a firewall.
4. Test Reverse DNS Lookup
In Command Prompt, type:
nslookup [IP_of_the_machine]Result analysis:
- If the machine name is returned, reverse DNS is working.
- If nothing is returned, reverse DNS may not be configured or may not cover this IP range.
