
Desktop Agent Architecture
Introduction
Desktop Agent (ADA) is the agent responsible for enabling the collection of hardware, software, performance and configuration change inventory information from desktops, analyzing the collected data and presenting them in the form of reports. Said services are deployed in an Internet-centric manner and in an automated manner, allowing them to be operated whenever and wherever you need technology asset management information.
The description of the general architecture of the services is presented below.
Secure Site
This page is the interface through which the user can use and customize Almaden’ services. The user mandatorily needs to create a personal account on this page before using any service. The personal account page is accessed through a secure connection (SSL) using an identification (the user’s own email address) and a password defined by the user.
Secure Site – environment-smartcenter.almaden.app
Environment: Lad1 or Lad2
Intelligent interface that handles collected information in which the user can manage technology assets according to ITAM best practices. The personal account page is accessed through a secure connection (SSL) and is modeled according to the access level allowed for the user.
Collecting Agents
Said components monitor the equipment chosen by users, collecting data about its operation and configuration, encrypting it, compressing it and sending it to ALMADEN CLOUD via the Internet.
The ADA Agent, used for workstations, works based on the combination of two distinct modules, the Agent Module and the Relay Module:
Agent Module
The Agent Module (aengine.exe) is installed on the equipment to be monitored. It collects, compresses and sends monitored data to the Relay Module. The ADA can also optionally send samples directly to ALMADEN CLOUD if an http connection is available between them. The way in which information is acquired by the Agent Module is one of the differentials of Almaden’ services, since, in most cases, data is acquired directly from the operating system kernel, greatly reducing intrusion on them. Actually, agents are designed to collect data in the least intrusive way possible for each operating system platform.
Relay Module
The Relay Module (arelay.exe) receives data from one or more Agent Modules, encrypts it and sends it to the ALMADEN CLOUD. It takes place as follows: the Relay Module opens queues of concurrent connections with the ALMADEN CLOUD for sending data. Each machine will have its data package sent, one at a time, to the same queue, thus ensuring the order of the data.
The connection queues that the Relay Module opens with ALMADEN CLOUD are configurable through parameters. It is possible to perform configurations such as: number of queues that can be opened with ALMADEN CLOUD, maximum and minimum number of packets in a queue, minimum percentage of queue size reduction, and time in seconds to scan queues.
The Relay Module can be installed on the same equipment as the Agent Module, providing the equipment with autonomy to communicate directly with the ALMADEN CLOUD. If there is a need to concentrate transmissions to the Internet at a single point, the Relay Module can be installed on a separate desktop, which we call Relay Server. A single Relay Server can concentrate and send data from several Agent Modules to ALMADEN CLOUD. It is also possible to configure an alternate Relay Server, which is automatically used in case of failure of the main Relay Server.
The architecture in separate modules was designed to provide great versatility in the installation of agents. The Relay Server acts as a sort of selective proxy for the Almaden service, which can be used to communicate isolated networks (for example, for security reasons) with the Internet, without violating current security policies. The figures below show the different ways to deploy agents:

Almaden Cloud
This is the component that hosts the IT intelligence included in Almaden’ services. In the first phase of the service operation cycle, ALMADEN CLOUD is responsible for receiving, decompressing, decrypting, storing and analyzing the data sent by the agents in a database. Once the storage is done, the user can activate the intelligence contained in the ALMADEN CLOUD, through the services available on the pages LAD1 and LAD2 , to analyze the collected data and produce conclusive and customized reports.
Supported Platforms
See the detailed documentation.
Plug-ins for the ADA Agent
Collecting agents have an open architecture that allows the installation of plug-ins capable of extending the functionality of an agent, enabling it to monitor other equipment performance parameters, such as collecting application performance measurements.
Plug-ins installed with the ADA package:
- Plug-in Asset (inventory of hardware, software, network, modem, system, monitor, etc.) Multimedia: information collection from the equipment’s moving disks:
- RegistryScan: Collection of general information via registration, either for confirmation or obtainment.
- FileDir: Collection of file system and executable file addresses whose activity has been logged;
- Group: collects Windows authentication security groups;
- User: Collects users created locally or from a domain that are part of local groups; – LogInOut: It collects login and logout events;
- Monitor: Collects information from the monitor plugged into the equipment;
- Slotinfo: Collects information about memory slots, what is occupying them and PCI slots;
- Sysinfo: Collects all hardware features of the equipment;
- Modem: Collects the modems of the equipment;
- Network: Collects information from the equipment’s network interfaces, collects geolocation information via op-api.com or Google geoservice
- Software: It collects software information.
- Plug-in Capacity (inventory and storage monitoring)
Average: Collects the information averages.
- Plug-in Performance (resource usage monitoring and load planning)
- PsStat: Collects consumption generated by processes running on the equipment.
- VmStat: Collects information on the equipment’s processing and memory consumption;
- IoStat: Collects performance information from disks.
- Plug-in of Software Metering (Measurement of software use and executables) – Softwaremetering: Collects information on actual software usage.
- PowerManager plug-in (power profile configuration management)
- PowerManager: Collects and changes power consumption settings.
Desktop Agent (old method)
Default command: ada.XXX.exe –s –a –s -<change command>
When performing a silent installation, the following switches should be used before any other options: “s -a -s”. The –ca and –cr switches or both must also be used for silent installation.
Available switches:
Switch: -i
Description: Mandatory switch that specifies the User ID of the customer.
OS: Windows and Linux
Example: ada.XXXX.exe -s -a -s -idemo@almaden.app -bdepartment –cr -ca
Switch: -b
Description: Switch that specifies the department where the machine will be registered.
OS: Windows and Linux
Example: ada.XXXX.exe -s -a -s -ixyz@almaden.app -bAgents –cr -ca
Switch: -ca
Description: The Agent Module will install and send collections to the HOST using the PORT.
OS: Windows and Linux
Exemple ada.XXXX.exe -s -a -s -ixyz@almaden.app -ca200.44.5.6:80
Switch: -cmdfile
Description: This switch allows us to specify the path to a text file, containing the installation parameters, on the command line. The “-sas” and “-pl” flags cannot be inside the text file to be used for installation. The -cmdfile is useful for installing ADA on Windows 9x, which has a maximum command line size limitation to apply.
OS: Windows and Linux
Example: ada.XXXX.exe -s -a –s – cmdfile”\\servername\dir1\commandline.txt”
Switch: -plPATH
Description: Path where the installation log file will be created.
OS: Windows and Linux
Example: ada.XXXX.exe -s -a -s -plc:\ -pi:c:\ada -ixyz@almaden.app -ca
Switch: -cr
Description: The Relay Module will be installed and will transmit data to the HOST using the PROTOCOL (HTTP or SSL) through the PORT
OS: Windows and Linux
Example: ada.XXXX.exe -s -a -s -plc:\ -ixyz@almaden.app -crhttp:10.54.1.18:80
Switch: -cred
Description: For Firewall Authentication
OS: Windows and Linux
Example: ada.XXXX.exe -s -a –s -ixyz@almaden.app -bDepartment credUSER:PASSWORD:DOMAIN
Switch: -erase
Description: Physically removes the agent.
OS: Windows
Example: adaXXXX.exe -s -a -s -erase
Switch: -http
Description: Configures the agent to communicate directly with ALMADEN CLOUD via HTTP protocol.
OS: Windows and Linux
Examples:
1 – ada.XXXX.exe -s -a -s -ixyz@almaden.app –bAgents – http:environment-receiver.almaden.app:80 (by default environment-receiver.almaden.app server and port 80)
2 – ada.XXXX.exe -s -a -s -ixyz@almaden.app -bAgents -http:environment-smartcenter.almaden.app:80 (using alternative data reception address)
Switch: -noui
Description: Indicates that the graphical interface should not be shown.
OS: Windows and Linux
Example: ada.XXXX.exe -s -a -s -ixyz@almaden.app -bAgents –cr -ca -noui
Switch: -oaar
Description: Sets an alternate, or secondary, HOST Relay using the PORT port.
OS: Windows and Linux
Example: ada.XXXX.exe -s -a -s -oaarWMICHEL:1999
Switch: -orfp
Description: Set the firewall IP address and port.
OS: Windows and Linux
Example: ada.XXXX.exe -s -a -s -orf192.168.0.253:2560
Switch: -orlp
Description: Defines the IP port to be used by the Relay Server to receive collections.
OS: Windows and Linux
Example: ada.XXXX.exe -s -a -s -orlp1999
Switch: -noperf
Description: Disables ADA performance measurement features. Once applied, this switch causes the agent to stop sending collections every hour.
OS: Windows and Linux
Example: ada.xxx.exe -s -a -s -ixyz@almaden.app -btest -noperf
Switch: -pi
Description: Specifies the path where ADA will be installed.
OS: Windows
Example: ada.XXXX.exe -s -a -s -plc:\ -pi:c:\ada -iyour@userid.com –ca
Switch: -prtcond
Description: Enables sending the status of the printer(s)
OS: Windows
Example: ada.XXXX.exe -s -a –s –prtcond -iyour@userid.com
Switch: -prtstat
Description: Enables the sending of printer statistics.
OS: Windows
Example: ada.XXXX.exe -s -a –s –prtstat -iyour@userid.com
Switch: -rel (Configure an agent to use a relay on the end. Xyz)
Description: Configures an agent to use a relay at address “xyz”. This relay can be locally installed or not.
OS: Windows and Linux
Example: ada.XXXX.exe -s -a -s -ixyz@almaden.app -bAgents -rel:192.168.1.48:1999
Switch: -scan
Description: Enables detection of software that does not register with Windows. This procedure implies a longer scanning. Use it only when strictly necessary.
OS: Windows
Example: ada.XXXX.exe -s -a –s –scan
Switch: -skip
Description: Allows you to indicate plug-ins that should NOT be enabled upon installation.
OS: Windows and Linux
Example: ada.XXXX.exe -s -a -s -ixyz@almaden.app -skip”Modem,Media”
Switches: -sntp and -sntpperiod
Description: SNTP (Simple Network Time Protocol) is a computer time adjustment service. From time to time (default is seven days), the service will request the right date and time from a time server and synchronize the computer with that time. To enable the SNTP service, you will have to add the following switch to the ADA installation line: sntp[server name[:port]]. Server name and port are optional. If no server name and port are filled in, the ADA will use the default values: time.windows.com:123. The –sntpperiod switch serves to define a period (in days) between two synchronization events with the time server. Its format is: -sntpperiod<days>. The <days> parameter specifies the period, in number of days, that the time server will be queried for synchronization. This switch is also optional. If it is not declared, the default period of 7 days will apply. For Windows XP, the only allowed values for this switch are: 1, 2, 3 and 7. Using any other value will cause -sntpperiod to apply the default value.
OS: Windows
Example: ada.XXXX.exe -sntptime.windows.com:123 –sntpperiod5
Switch: -bsupport
Description: Captures the subset of Microsoft Office utilities.
OS: 9x, NT (and above).
Example: ada.XXXX.exe -s -a -s -swbrk -ixyz@almaden.app -bsupport
Switch: -ti
Description: Time interval between consecutive collections.
OS: Windows and Linux
Example: adaXXX.exe -s -a -s -ixyz@almaden.app -bAgents -ca -cr -ti12
Switch: -orsf
Description: Configures the number of relay module send attempts.
OS: Windows and Linux
Example: adaXXX.exe -s -a -s -ixyz@almaden.app -orsf10
Switch: -nosmpolling
Description: Disables the use of polling by default in SW Metering collections.
OS: Windows and Linux
Example: adaXXX.exe -s -a -s -ixyz@almaden.app -nosmpolling
Switch: -proxyauth
Description: Enable proxy reset through proxyauth.exe
OS: Windows and Linux
Example: adaXXX.exe -s -a -s -ixyz@almaden.app -proxyauth
Switch: -nosmwin
Description: Disables sending data about the use of program windows.
OS: Windows
Example: adaXXX.exe -s -a -s -ixyz@almaden.app -nosmwin
Switch: -nounicode
Description: Does not use Unicode in software collection.
OS: Windows
Example: adaXXX.exe -s -a -s -ixyz@almaden.app -nounicode
Switch: -ps
Description: Enable pseudo-silent mode. In this mode only some configurator screens are displayed.
OS: Windows
Example: adaXXX.exe -s -a -s -ixyz@almaden.app -ps
Switch: -noinstkey
Description: Does not send installation keys used in Microsoft products.
OS: Windows
Example: adaXXX.exe -s -a -s -ixyz@almaden.app -noinstkey
Switch: -nofullos
Description: Does not send data in SysInfo collection necessary to identify whether Windows is Professional or Home, whether it is Enterprise or Standard, etc.
OS: Windows
Example: adaXXX.exe -s -a -s -ixyz@almaden.app –nofullos
Switch: -nofirsttu
Description: This switch will make the FirstTU value equal to zero in the registry at installation time, thus preventing the department from changing the site.
OS: Windows
Example: adaXXX.exe -s -a -s -ixyz@almaden.app -nofirsttu
Switch: -sendtime
Description: This switch makes it possible to define the interval of hours to send the ADA and Relay collections. The time interval for sending the collections will be done through a parameter, then the time used as a parameter will automatically disable the others. This interval can be from 00:00 to 23:00.
OS: Windows
Examples:
1 – ada.xxx.exe -s -a -s -ixyz@almaden.app -sendtime0-6
In this example, 0 defines the starting time for sending the collections and 6 is the end time, in this way, collections will take place between 0:00 and 6:59 in the morning.
2- ada.xxx.exe -s -a –s -ixyz@almaden.app -sendtime0-6:22-23
In this example, 2 intervals were defined for sending the collections. The 1st, which will take place between 12:00 am and 6:59 am, and the 2nd, which will take place from 10:00 pm to 11:59 pm.
3 – ada.xxx.exe -s -a -s -ixyz@almaden.app -sendtime0-3:8-13:23-23
In this example, 3 intervals were defined for sending the collections. The 1st, which will take place between 12:00 am and 3:59 am, the 2nd, which will take place between 8:00 am and 1:59 pm, and the 3rd, which will take place between 11:00 pm and 11:59 pm.
For every time the data is not sent, the following message will be saved in the log: “Cannot send data in this hour”.
Switch: -token and -gfreq
Description: This switch enables links the geolocation collection with a google geolocation service token, it is used together with the parameter that determines the frequency of collection of this information <frequency determination parameter>.
OS: Windows
Examples: 1 – ada.xxx.exe -s -a -s -ixyz@almaden.app -token<google token specification parameters> -gfreq<frequency determination parameter>.
Note: Default is 60 minutes “-gfreq-60”
Parameters for the Relay Module
The parameters below can be used to control the connection queues that the Relay Module will open with ALMADEN CLOUD.
The values for each parameter must be edited in the Windows Registry Key through the following path:
HKEY_LOCAL_MACHINE\SOFTWARE\WOW6432Node\Automatos\Asa\Relay\3.0
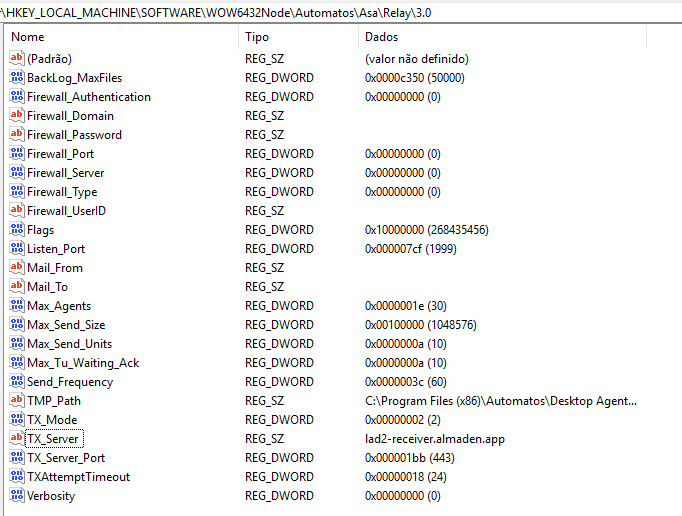
Parameters
Parameter: Max_Num_Queue
Description: Defines the maximum number of queues that can be opened with ALMADEN CLOUD. The default is 10 queues.
Parameter: Max_Tus_Queue
Description: Defines the maximum number of packets in a queue, creating a new queue when this number is exceeded. The default is 1000 packages.
Parameter: Num_Tus_2_Check_Queue_Dec
Description: Defines the minimum number of packets in the queue to be able to use the distribution criterion. The default is 500 packages.
Parameter: Min_Perc_Queue_Dec
Description: Sets the minimum percentage of queue size reduction between checks. If the queue size decreases by less than this percentage, a new queue will be created. The standard is 5% of decrease.
Parameter: Queue_Check_Time
Description: Sets the time in seconds to check queues. Default is 300 seconds
Removing the Desktop Agent
See the detailed documentation.
Commands and functions (Microsoft Windows)
After installing the ADA, you can control, verify and customize the service through the GUI.
The ADA’s graphical user interface (GUI) is called the ADA Control Center. It is the primary means of interacting with the ADA in the Windows environment. You can start from the folder:"C:\Program Files (x86)\Automatos\Desktop Agent\adacontrol.exe"
The ADA Control Center has two panels. The one on the left shows installed modules and their status. The one on the right shows the configuration. See the illustration below:
Agent Module
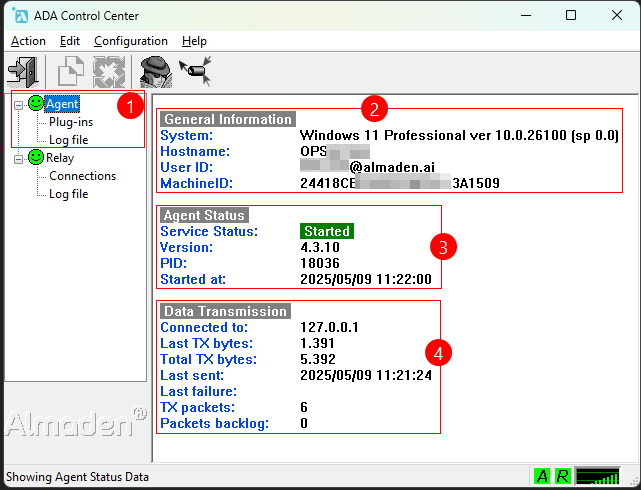
1. Agent – information panel
Agent:Start and stop ServicePlug-ins:Displays information about the Relay, Plug-ins, and Log fileLog File:Displays the log file.- Note: You can stop/start the services by right-clicking on the Smile icon
2. Agent – General Information
System:Displays the name and version of the installed operating system.Hostname:Shows the computer’s name.User ID:Tenant accountMachineID:Identifies the unique ID of the machine.
3. Agent – Agent Status
Service Status:Indicates whether the service is currently running or stopped.Version:Shows the current version of the application or service.PID:Displays the Process ID assigned to the running service. (aengine.exe)Started at:Shows the date and time when the service was started.
4. Agent – Data Transmission
Connected to:Indicates the destination or endpoint the system is connected to.Last TX bytes:Shows the number of bytes transmitted in the last transfer.Total TX bytes:Displays the total number of bytes transmitted since the connection started.Last Sent:Shows the date and time of the last successful transmission.Last Failure:Indicates the date and time of the last failed transmission attempt.TX packets:Displays the total number of transmitted packets.Packets backlog:Shows the number of packets waiting to be transmitted.
Relay Module
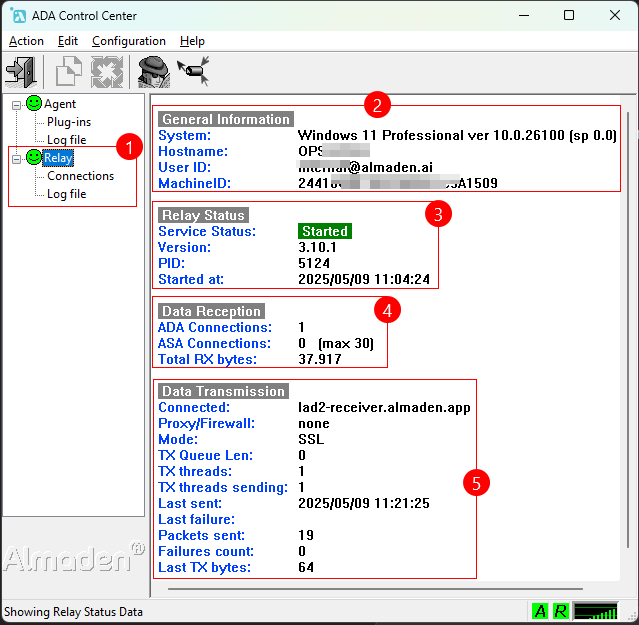
1. Relay – information panel
Relay:Start and stop ServiceConnections:Displays the information of the devices connected to this relay (It can also send data from another device when configured).Log File:Displays the log file.- Note: You can stop/start the services by right-clicking on the Smile icon
2. Relay – General Information
System:Displays the name and version of the installed operating system.Hostname:Shows the computer’s name.User ID:Tenant accountMachineID:Identifies the unique ID of the machine.
3. Relay- RelayStatus
Service Status:Indicates whether the service is currently running or stopped.Version:Shows the current version of the application or service.PID:Displays the Process ID assigned to the running service. (aengine.exe)Started at:Shows the date and time when the service was started.
4. Relay – Data transmission
- Connected: Indicates the current connection status or endpoint.
- Proxy/Firewall: Shows whether a proxy or firewall is in use and its status.
- Mode (SSL): Indicates if SSL encryption is being used for the connection.
- TX Queue len: Displays the length of the transmission queue.
- TX threads: Shows the number of threads handling transmission tasks.
- TX threads sending: Indicates the number of transmission threads currently sending data.
- Last sent: Shows the timestamp of the last successful transmission.
- Last failure: Displays the timestamp of the last transmission failure.
- Packets sent: Indicates the total number of packets successfully sent.
- Failures count: Shows the total number of transmission failures.
- Last TX bytes: Displays the number of bytes transmitted in the last transfer.
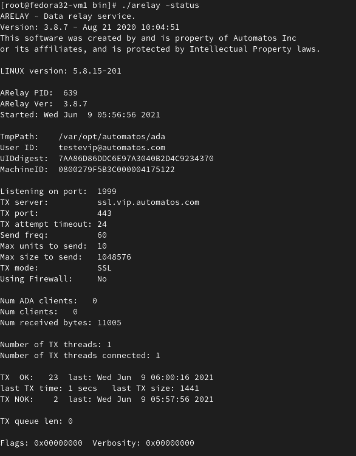
Commands and functions (Linux Platforms)
On Linux family platforms, the Agent status screen is displayed as shown below, where the main Agent modules and equipment data are displayed, such as Machine ID, User ID, Relay annotation and whether the communication to it has been successfully established, as well as the date of last collection sending or last failure date, the modules loaded and the status of each one.
Agent Module
/opt/automatos/ada/bin/aengine -status
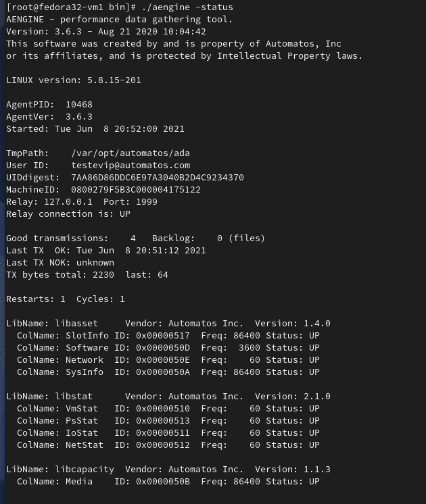
Relay Module
/opt/automatos/ada/bin/arelay -status
Machine ID (MID) information
The MID is made up of 12 bytes and is represented as a 24-character string. Each pair of characters represents a byte.
Desktop Agent
The MID is divided into four parts:
Byte from 0 to 5 = Mac Address = 64 1C 67 B8 4F 60
Byte from 6 to 9 = Hostname = 65 A8 C8 18
Byte 10 = SO Version = 15
Byte 11 = Check digit of the Machine ID = 5F
###### Example #####
Byte:        0  1  2  3  4  5  6  7  8  9 10 11
Machine ID: 64 1C 67 B8 4F 60 65 A8 C8 18 15 5F
The byte 10 is comprised as follows: the first character is the OS, the second character is the platform.
If item 3 of the MID is 51 we will have: Linux + IntelX86
| Current OS character values: | |
| SO | Value |
| WINNT | 1 |
| WIN9X | 2 |
| AIX | 3 |
| SOLARIS | 4 |
| LINUX | 5 |
| HP | 6 |
| TRU64 | 7 |
| FREEBSD | 8 |
| WINCE | 12 |
| Current Platform character values: | |
| Platform | Value |
| INTELX86 | 1 |
| INTELI64 | 2 |
| RISC | 3 |
| IBMS390 | 4 |
| ALPHA | 5 |
| NEW_INTELx86 | 5 |
| PWINCE | 14 |
Windows: The first ID is the MAC address of one of the network cards (it can be any), the second ID is the hostname of the machine in the form of a hash and the platform/OS identifier can be 15 for windows NT base and above
Linux: The first ID is the MAC address of one of the network cards (it can be any one), the second ID is the hostname of the machine in the form of a hash and the platform/OS identifier is 51
Recommendations
- If you change a machine’s network card or operating system, and the agent cannot find the machine’s serial number, ALMADEN CLOUD erroneously assumes it is a new enabled machine. If this happens, please contact our support team via the SUPPORT.
- If you need to concentrate transmissions from multiple Agent Modules on just one Internet connection, you should use only one server with the Relay Module installed. However, the Relay Module can only support 30 concurrent
Server AgentModules in its default configuration, if you need more connections optimally make changes to the send settings to handle the new load. Each Relay has a maximum capacity of 350Server Agentssimultaneously, above that we recommend installing more relays in the transmission structure.
