
Linux Installation – Desktop and Server Agent
This document aims to show the installation procedure of Automatos Desktop / Server Agent for the Linux Operating System.
To start the installation, copy the binary to the /tmp directory of the machine that will be installed.
To do this, identify which Linux distribution is.
We currently have 2 types of “ADA” (Desktop Agent) and “ASA” (Server Agent) Agents:
- For Debian-based Distributions (.deb). Debian, Ubuntu, etc;
- For Red Hat (.rpm) based Distributions. Red Hat, Suse, Fedora, etc.
Download Agent
https://lad1-smartcenter.almaden.app/auth/signin/ if your account is from the LAD1 environment.
https://lad2-smartcenter.almaden.app/auth/signin/ if your account is from the LAD2 environment.
NOTE: To download the agent, you need access to SmartCenter / CIQ ITAM, and your account must have the necessary permissions to download the agent.

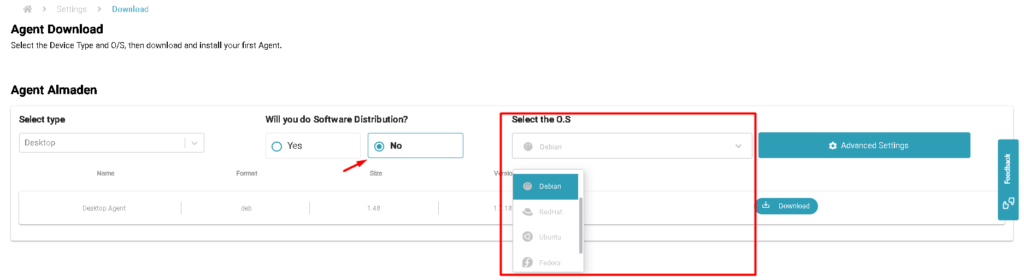
Note: Software distribution is only available for Microsoft Windows.
.deb x32 – Installation
Desktop Agent (ADA) and Server Agent (ASA) for common linux distributions: Debian, Ubuntu, Mint…
1 – Update Repository (Optional)
apt update2 – Install library libc6 for x32
apt-get -y install libc63 – Elevate installation package permission (Check the name of the package that was downloaded.)
chmod 775 axa-##.##.##-en.i386.lin.deb4 – Install Desktop Agent or Server Agent (Check the name of the package that was downloaded.)
dpkg -i axa-x.x.x-en.i386.lin.deb.deb x32 – Data sending configuration
The data forwarding configuration can be done for SmartCenter Cloud or Central Relays
Execute only one of the following configuration commands, either SmartCenter Cloud or Central Relays.
NOTE: Replace the fields below with your environment.
<your@account.com>: The primary SmartCenter access account.
<Department>: The department to which the equipment should be organized in SmartCenter.
<ENV>: The database where the account is created in SmartCenter, which can be lad1 or lad2.
<RELAY1> and <RELAY2> : Replace the fields with the IP or Hostname of the Central Relays.
- -i is the main account in CIQ ITAM DEX
- -b is Department to be created
- -ca is the sender and port
- -crssl: It depends on your environment between lad1 and lad2
- lad1-receiver.almaden.app:443
- lad2-receiver.almaden.app:443
- -orfp is the proxy ip and port
Data sending SmartCenter Cloud
SmartCenter Cloud – Desktop Agent (ADA)
/opt/automatos/ada/bin/asetup -s -a -s -i<your@account.com> -b<Department> -ca127.0.0.1:1999 -crssl:<ENV>-receiver.almaden.app:443SmartCenter Cloud – Server Agent (ASA):
/opt/automatos/asa/bin/asetup -s -a -s -i<your@account.com> -b<Department> -ca127.0.0.1:1999 -crssl:<ENV>-receiver.almaden.app:443EXAMPLE:![]()
NOTE: The expected outcome after executing the configuration SmartCenter Cloud command.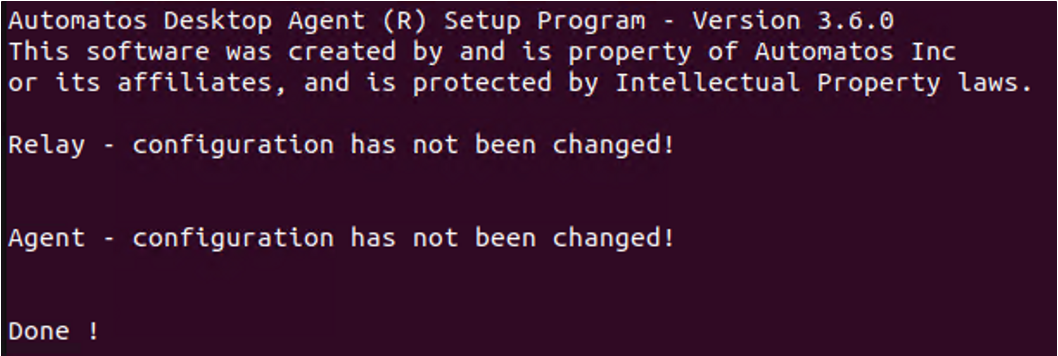
Data sending Central Relays
Central Relays – Desktop Agent (ADA)
/opt/automatos/ada/bin/asetup -s -a -s -i<your@account.com> -b<Department> -ca<RELAY1>:1999 -oaar<RELAY2>:1999Central Relays – Server Agent (ASA)
/opt/automatos/asa/bin/asetup -s -a -s -i<your@account.com> -b<Department> -ca<RELAY1>:1999 -oaar<RELAY2>:1999NOTE: The expected outcome after executing the configuration to Central Relays command.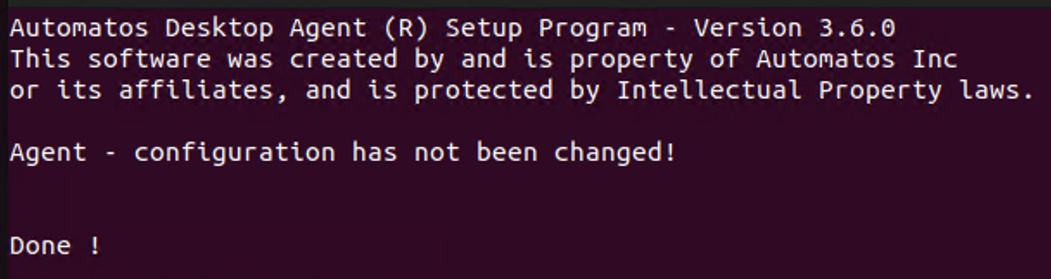
End of configuration .deb x32
.deb x64 – Installation
1 – Update Repository (Optional)
apt update2 – Install library libc6 for x64
apt-get -y install libc6-i3863 – Elevate installation package permission (Check the name of the package that was downloaded.)
chmod 775 axa-##.##.##-en.i386.lin.deb4 – Install Desktop Agent or Server Agent (Check the name of the package that was downloaded.)
dpkg -i axa-x.x.x-en.i386.lin.deb.deb x64 – Data sending configuration
The data forwarding configuration can be done for SmartCenter Cloud or Central Relays
Execute only one of the following configuration commands, either SmartCenter Cloud or Central Relays.
NOTE: Replace the fields below with your environment.
<your@account.com>: The primary SmartCenter access account.
<Department>: The department to which the equipment should be organized in SmartCenter.
<ENV>: The database where the account is created in SmartCenter, which can be lad1 or lad2.
<RELAY1> and <RELAY2> : Replace the fields with the IP or Hostname of the Central Relays.
Data sending SmartCenter Cloud
SmartCenter Cloud – Desktop Agent (ADA)
/opt/automatos/ada/bin/asetup -s -a -s -i<your@account.com> -b<Department> -ca127.0.0.1:1999 -crssl:<ENV>-receiver.almaden.app:443SmartCenter Cloud – Server Agent (ASA):
/opt/automatos/asa/bin/asetup -s -a -s -i<your@account.com> -b<Department> -ca127.0.0.1:1999 -crssl:<ENV>-receiver.almaden.app:443EXAMPLE:![]()
NOTE: The expected outcome after executing the configuration SmartCenter Cloud command.
Data sending Central Relays
Central Relays – Desktop Agent (ADA)
/opt/automatos/ada/bin/asetup -s -a -s -i<your@account.com> -b<Department> -ca<RELAY1>:1999 -oaar<RELAY2>:1999Central Relays – Server Agent (ASA)
/opt/automatos/asa/bin/asetup -s -a -s -i<your@account.com> -b<Department> -ca<RELAY1>:1999 -oaar<RELAY2>:1999NOTE: The expected outcome after executing the configuration to Central Relays command.
End of configuration .deb x64
.rpm x32 – Installation
1 – Refresh Repository (Optional)
zypper refresh2 – Install library glibc for x32
zypper install glibc -y3 – Elevate installation package permission (Check the name of the package that was downloaded.)
chmod 775 axa-x.x.x-en.i386.lin.rpm4 – Install Desktop Agent or Server Agent (Check the name of the package that was downloaded.)
rpm -Uhv axa-x.x.x-en.i386.lin.rpm.rpm x32 – Data sending configuration
The data forwarding configuration can be done for SmartCenter Cloud or Central Relays
Execute only one of the following configuration commands, either SmartCenter Cloud or Central Relays.
NOTE: Replace the fields below with your environment.
<your@account.com>: The primary SmartCenter access account.
<Department>: The department to which the equipment should be organized in SmartCenter.
<ENV>: The database where the account is created in SmartCenter, which can be lad1 or lad2.
<RELAY1> and <RELAY2> : Replace the fields with the IP or Hostname of the Central Relays.
Data sending SmartCenter Cloud
SmartCenter Cloud – Desktop Agent (ADA)
/opt/automatos/ada/bin/asetup -s -a -s -i<your@account.com> -b<Department> -ca127.0.0.1:1999 -crssl:<ENV>-receiver.almaden.app:443SmartCenter Cloud – Server Agent (ASA):
/opt/automatos/asa/bin/asetup -s -a -s -i<your@account.com> -b<Department> -ca127.0.0.1:1999 -crssl:<ENV>-receiver.almaden.app:443EXAMPLE:![]()
NOTE: The expected outcome after executing the configuration SmartCenter Cloud command.
Data sending Central Relays
Central Relays – Desktop Agent (ADA)
/opt/automatos/ada/bin/asetup -s -a -s -i<your@account.com> -b<Department> -ca<RELAY1>:1999 -oaar<RELAY2>:1999Central Relays – Server Agent (ASA)
/opt/automatos/asa/bin/asetup -s -a -s -i<your@account.com> -b<Department> -ca<RELAY1>:1999 -oaar<RELAY2>:1999NOTE: The expected outcome after executing the configuration to Central Relays command.
End of configuration .rpm x32
.rpm x64 – Installation
1 – Refresh Repository (Optional)
zypper refresh2 – Install library glibc x32
zypper install glibc-32bit -y3 – Elevate installation package permission (Check the name of the package that was downloaded.)
chmod 775 axa-x.x.x-en.i386.lin.rpm4 – Install Desktop Agent or Server Agent (Check the name of the package that was downloaded.)
rpm -Uhv axa-x.x.x-en.i386.lin.rpm.rpm x64 – Data sending configuration
The data forwarding configuration can be done for SmartCenter Cloud or Central Relays
Execute only one of the following configuration commands, either SmartCenter Cloud or Central Relays.
NOTE: Replace the fields below with your environment.
<your@account.com>: The primary SmartCenter access account.
<Department>: The department to which the equipment should be organized in SmartCenter.
<ENV>: The database where the account is created in SmartCenter, which can be lad1 or lad2.
<RELAY1> and <RELAY2> : Replace the fields with the IP or Hostname of the Central Relays.
Data sending SmartCenter Cloud
SmartCenter Cloud – Desktop Agent (ADA)
/opt/automatos/ada/bin/asetup -s -a -s -i<your@account.com> -b<Department> -ca127.0.0.1:1999 -crssl:<ENV>-receiver.almaden.app:443SmartCenter Cloud – Server Agent (ASA):
/opt/automatos/asa/bin/asetup -s -a -s -i<your@account.com> -b<Department> -ca127.0.0.1:1999 -crssl:<ENV>-receiver.almaden.app:443EXAMPLE:![]()
NOTE: The expected outcome after executing the configuration SmartCenter Cloud command.
Data sending Central Relays
Central Relays – Desktop Agent (ADA)
/opt/automatos/ada/bin/asetup -s -a -s -i<your@account.com> -b<Department> -ca<RELAY1>:1999 -oaar<RELAY2>:1999Central Relays – Server Agent (ASA)
/opt/automatos/asa/bin/asetup -s -a -s -i<your@account.com> -b<Department> -ca<RELAY1>:1999 -oaar<RELAY2>:1999NOTE: The expected outcome after executing the configuration to Central Relays command.
End of configuration .rpmx64
Command line for proxy configuration
-s -a -s -iyouraccount@account.com -bAlmaden -ca127.0.0.1:1999 -crssl:lad2-receiver.almaden.app:443 -orfp<IPAddress>:<PORT>

#Example
-s -a -s -ialmaden@almaden.ai-bAlmaden -ca127.0.0.1:1999 -crssl:lad2-receiver.almaden.app:443 -orfp10.10.5.12:8080- -i is the main account in CIQ ITAM DEX
- -b is Department to be created
- -ca is the sender and port
- -crssl: It depends on your environment between lad1 and lad2
- lad1-receiver.almaden.app:443
- lad2-receiver.almaden.app:443
- -orfp is the proxy ip and port
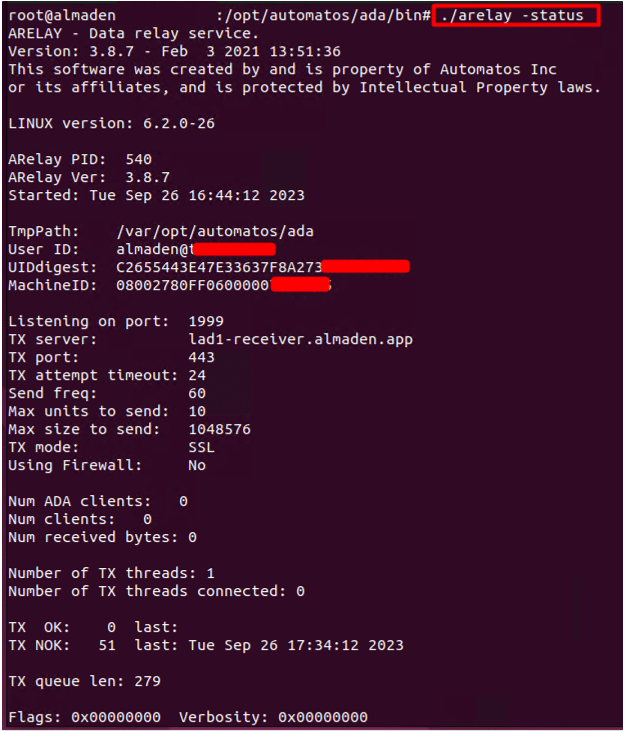
Status of agents
The following commands are used to check the configurations applied to the Desktop Agent and Server Agent.
Status – Desktop Agent
Desktop Agent “aengine” and “arelay” status
/opt/automatos/ada/bin/aengine -status
/opt/automatos/ada/bin/arelay -status
Status – Server Agent
Server Agent “aengine” and “arelay” status
/opt/automatos/asa/bin/aengine -status
/opt/automatos/asa/bin/relay -status
Check “aengine” and “arelay” status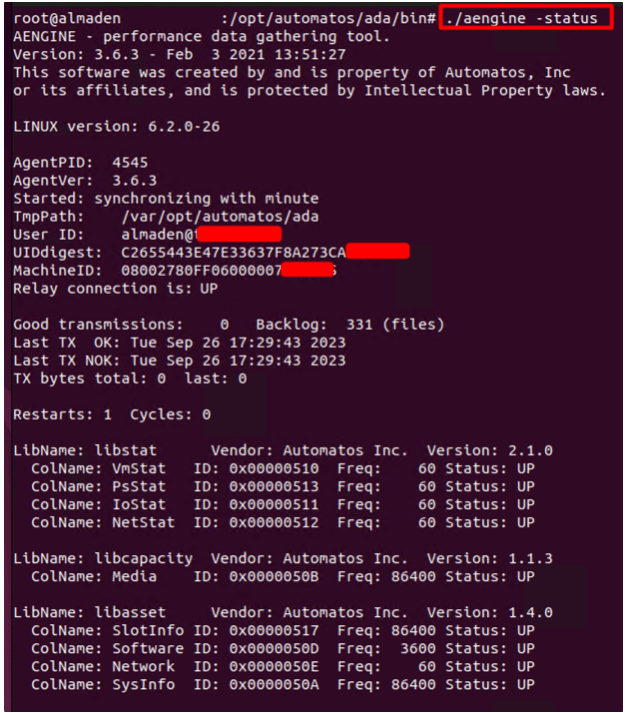
Services
Interacting with the Desktop Agent and Server Agent services.
# Start Services
systemctl start aengine
systemctl start arelay

# Stop Services
systemctl stop aengine
systemctl stop arelay

# Restart Services
systemctl restart aengine
systemctl restart arelay

# Status Services
systemctl status aengine
systemctl status arelay