Basic Features – Set Unattended Access
Introduction
The Set Unattended Access feature allows you to install Automatos Remote Control Server on the remote computer directly during a session. This feature is useful when you need to access the same computer repeatedly, ensuring remote connections without requiring user intervention.
The process involves defining a name for the computer, selecting a group, setting an access password, and installing Automatos Remote Control Server. Depending on the operating system and version, the procedure may vary slightly.
Below, you will find detailed steps to configure Unattended Access and ensure continuous remote connections.
Set Unattended Access
Overview
Allows the installation on the remote computer during a session.
This feature is useful if you need to repeatedly access the same remote computer.
Follow the steps below to add a remote computer to your Automatos Remote Control Server list.
Step 1

Click on “Set Unattended Access” from the Tools menu.
Note: If the remote computer is already in your list, the “Set Unattended Access” option will not be available in the dropdown menu.
Step 2

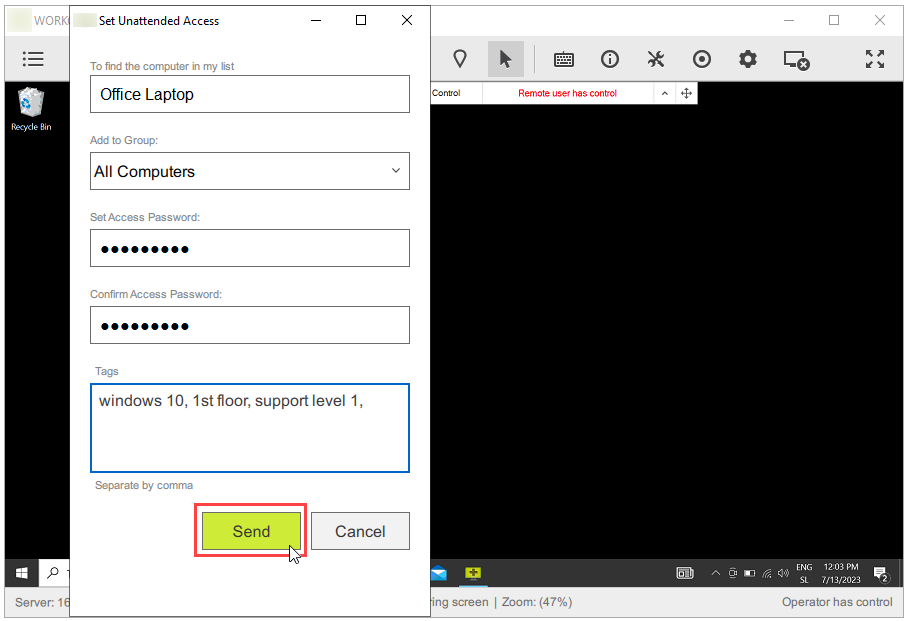
1. Enter a computer name for the remote computer.
- This alias will be displayed in your Automatos Remote Control Viewer list.
- Choose a descriptive name for easier identification.
- If left blank, a default name (e.g., WORKGROUP* ) will be assigned.
2. Select a group for the remote computer.
- The available groups are the ones you created.
- Note: If no group is selected, the computer will be placed in All Computers (default group).
3. Set an access password to connect to the remote computer.
- You can also add tags (separated by commas) for easier searching.
Important:
If Automatos Remote Control Server is already installed, only the Connection access password (used for account login) will be set.
If Automatos Remote Control Server is installed for the first time, both Connection access password and Main access password (used for any account) will be set.
Step 3

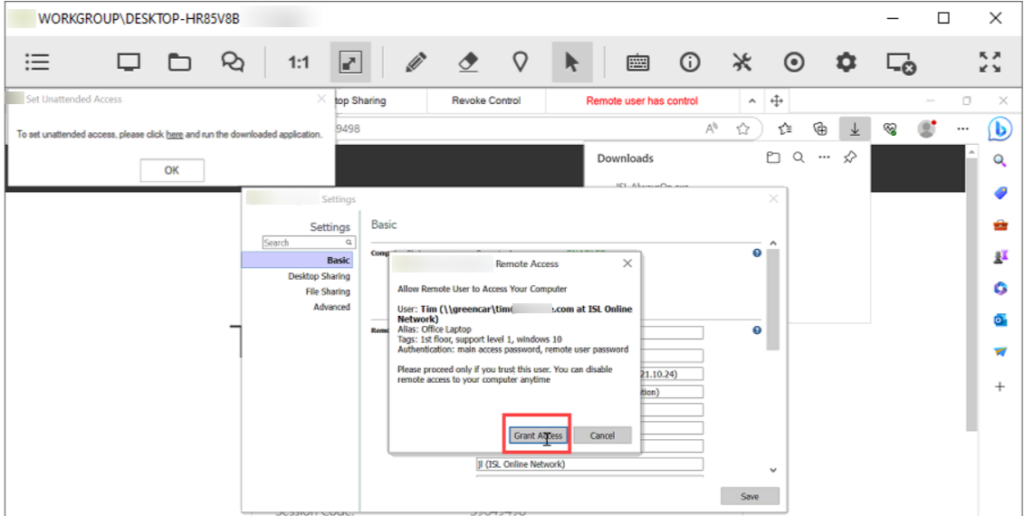
Click “here” to install Automatos Remote Control Server or right-click on “here” to copy the download link.
Installation process varies by operating system and Automatos Remote Control Server version:
- macOS: Installation starts automatically, proceed to Step 7.
- Windows: A popup appears on the remote computer. Click “here” to download Automatos Remote Control Server.
- If the popup does not appear on the remote computer, it will be displayed on your local computer.
- In this case, copy the link and send it via email, shared clipboard, or chat.
Step 4

Run Automatos Remote Control Server.exe and follow the installation wizard.
Click “Finish” once the installation is complete.
Step 5

Click “Grant Access” to add the computer to your Automatos Remote Control Server list.
Important:
Review the access permissions carefully.
Ensure you are granting access to the correct user.
Step 6

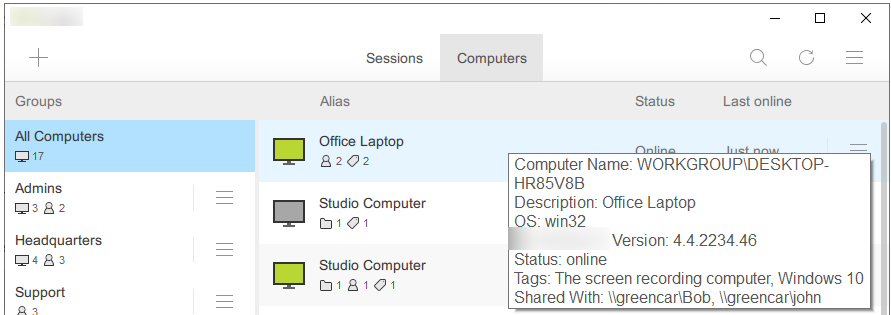
You can now connect to the remote Automatos Remote Control Server computer.
Alternative Methods to Set Unattended Access
You can install Automatos Remote Control Server through different methods:
Via Automatos Remote Control Viewer
🔹 Add this Computer
🔹 Set Unattended Access via Email
🔹 Set Unattended Access via Link
🔹 Set Unattended Access via Code
🔹 Set Unattended Access in Session (this guide)
Via My Account
🔹 Add this Computer
🔹 Add Remote Computer
🔹 Custom Deployment Link

